

Brown Sugar Cookies (The BEST Base Cookie Dough Recipe!)
This brown sugar cookie is one of the simplest, yet tastiest cookie recipes I have made! Only a handful of ingredients that you probably have in your pantry right now.
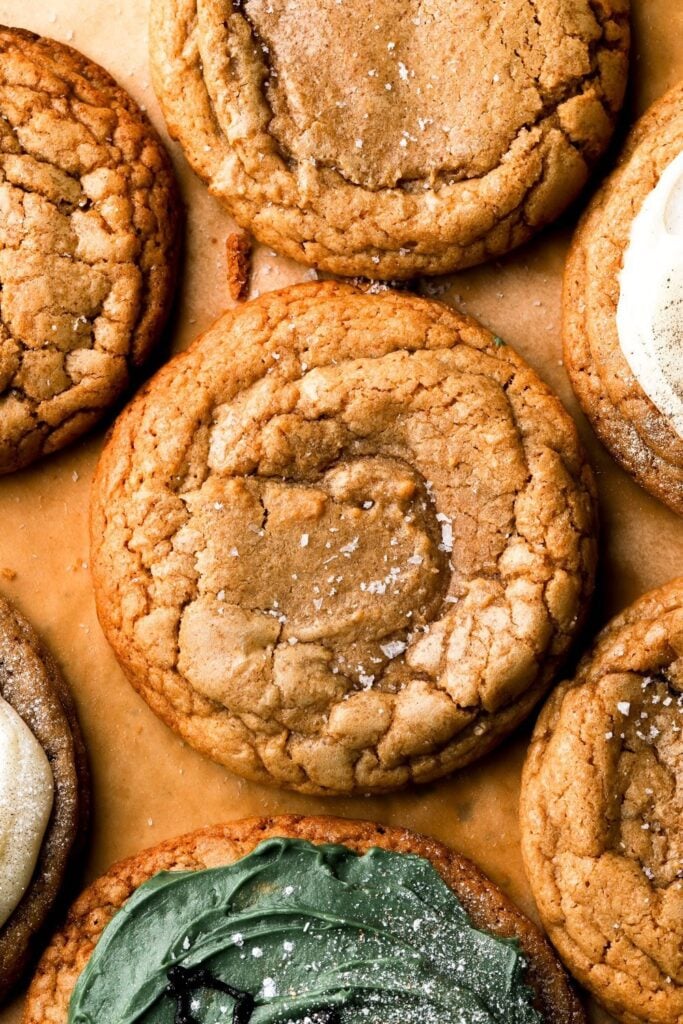
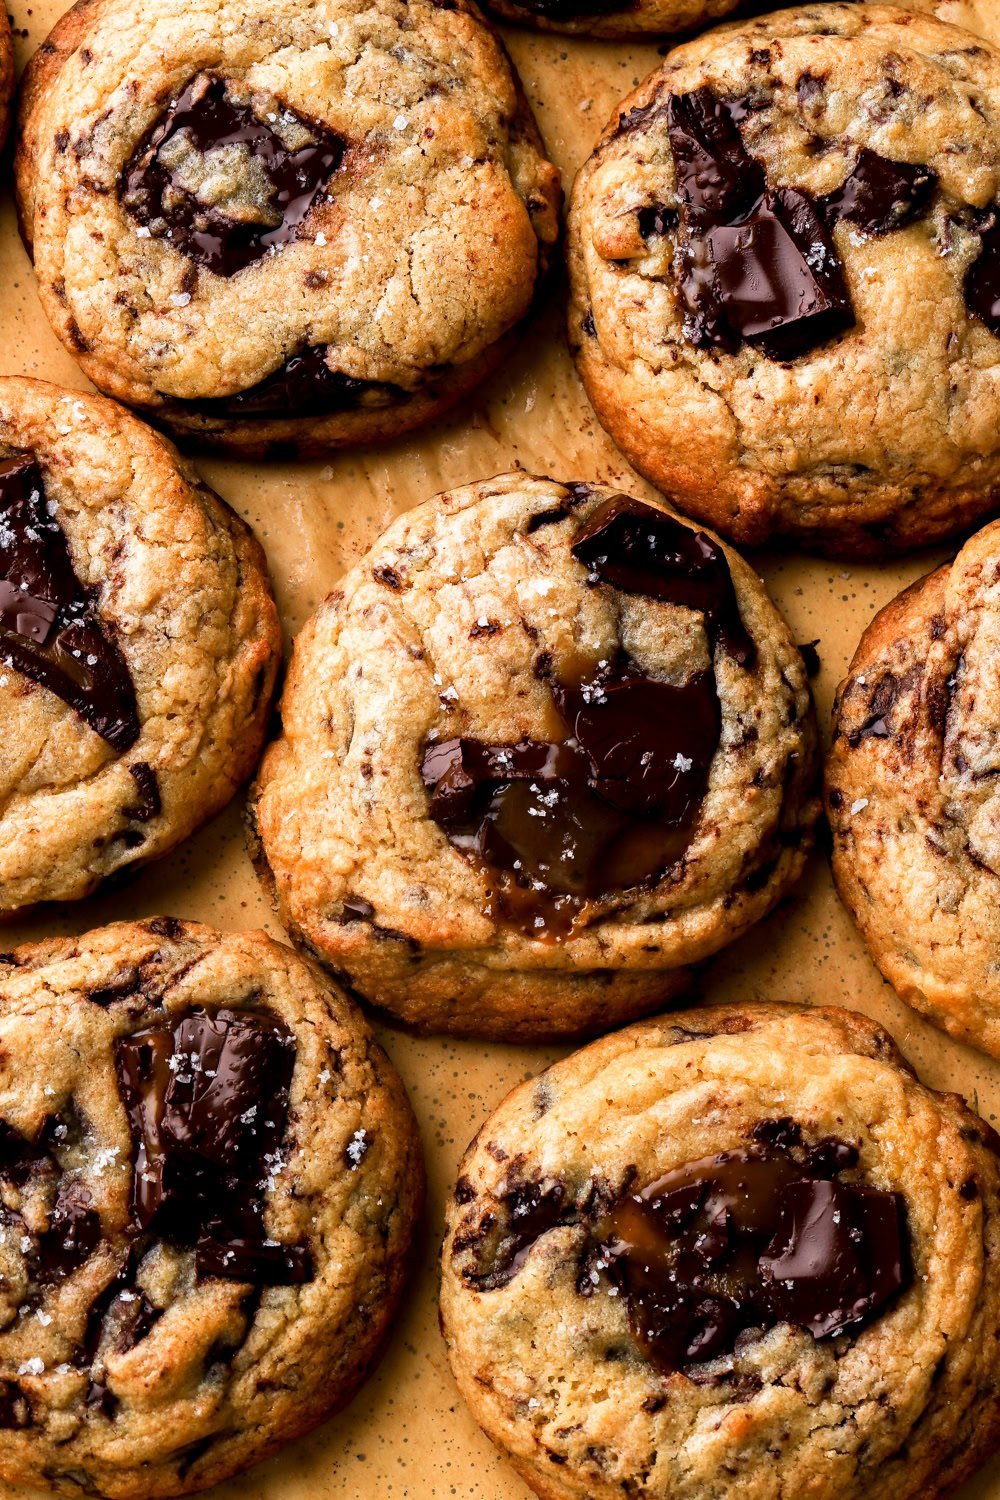
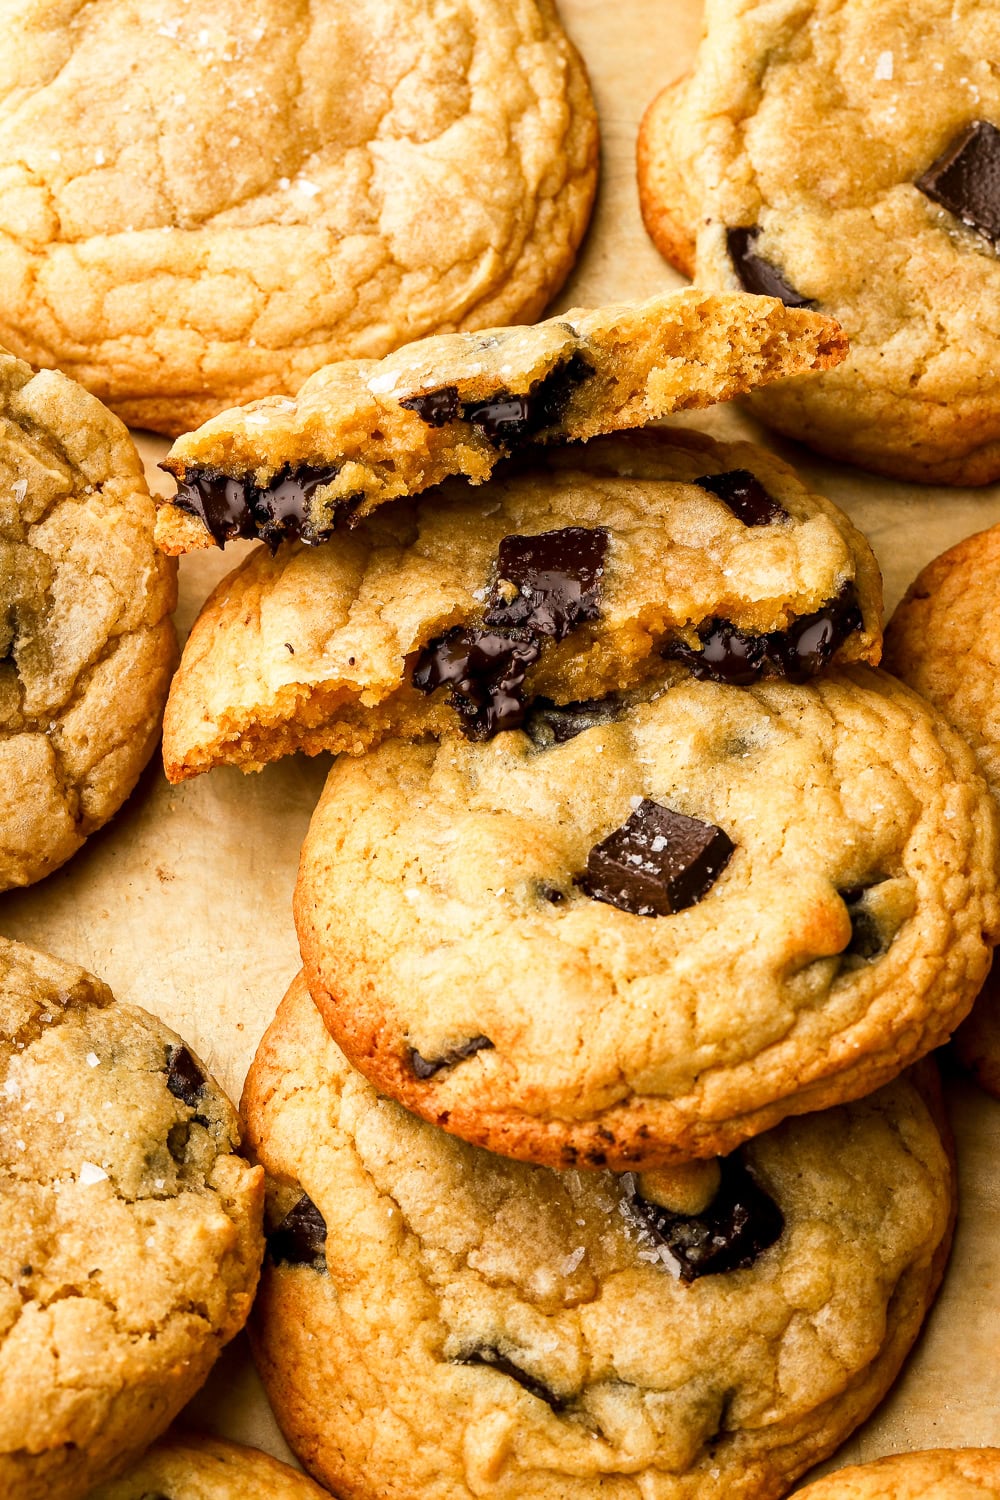
They’re crinkly around the edge, soft and chewy in the center, butterscotch-like flavor from the brown butter and brown sugar and of course, the flakey sea salt makes them irresistible.
The best part?! Even though it’s simple to make, it’s one of the best base cookie recipes that you can alter in sooo many ways! I use this as the base for most of my cookies now.
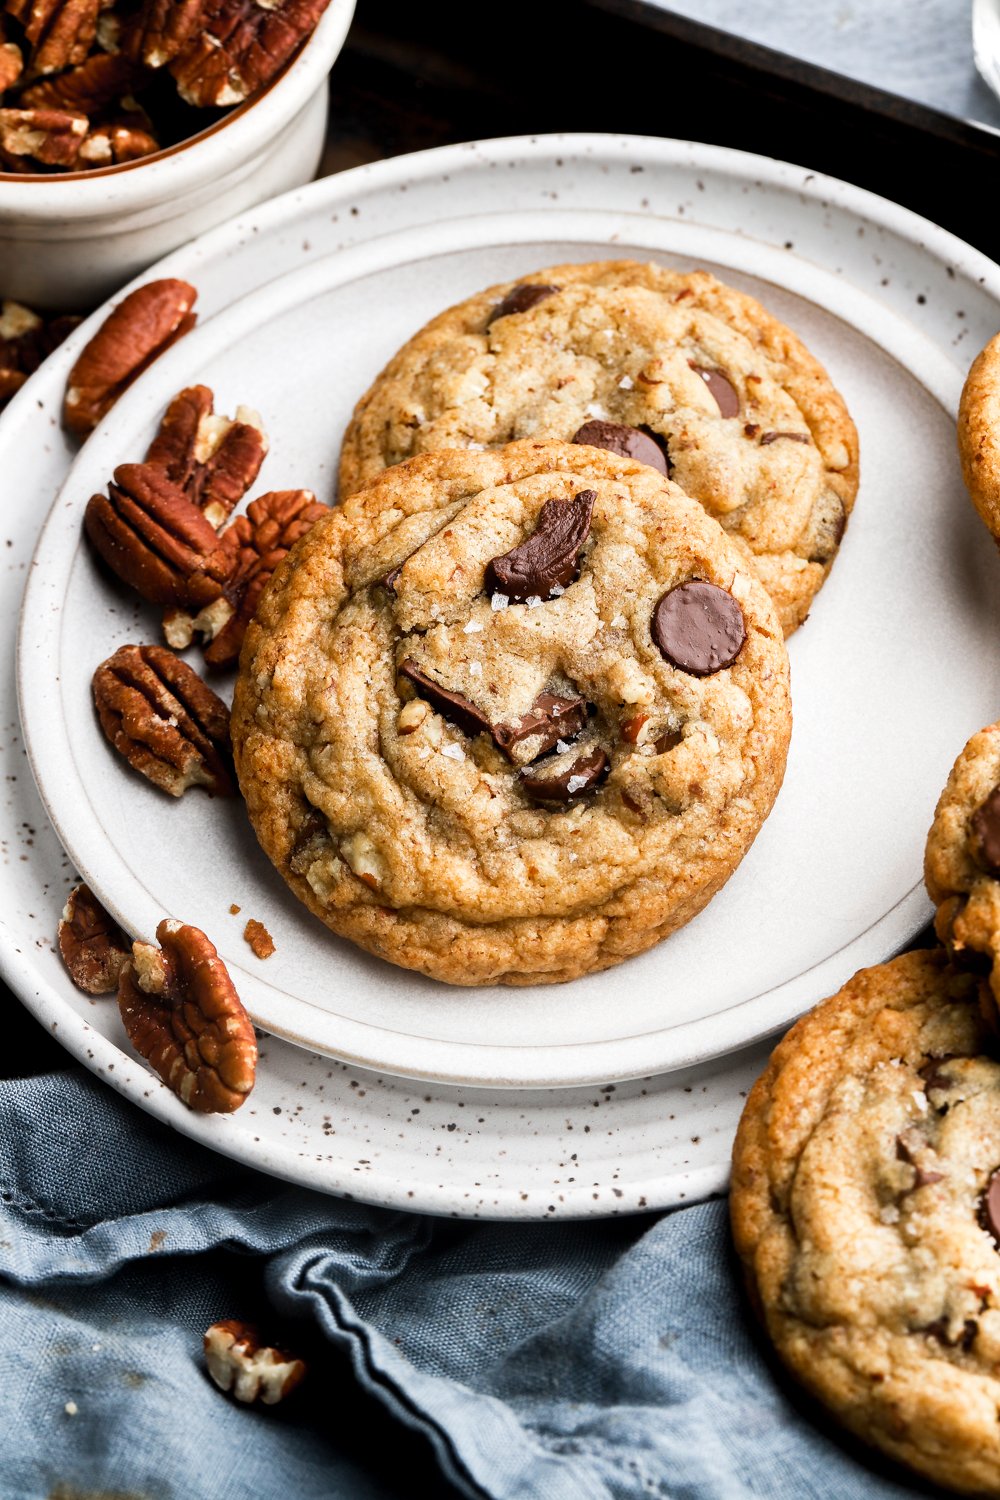
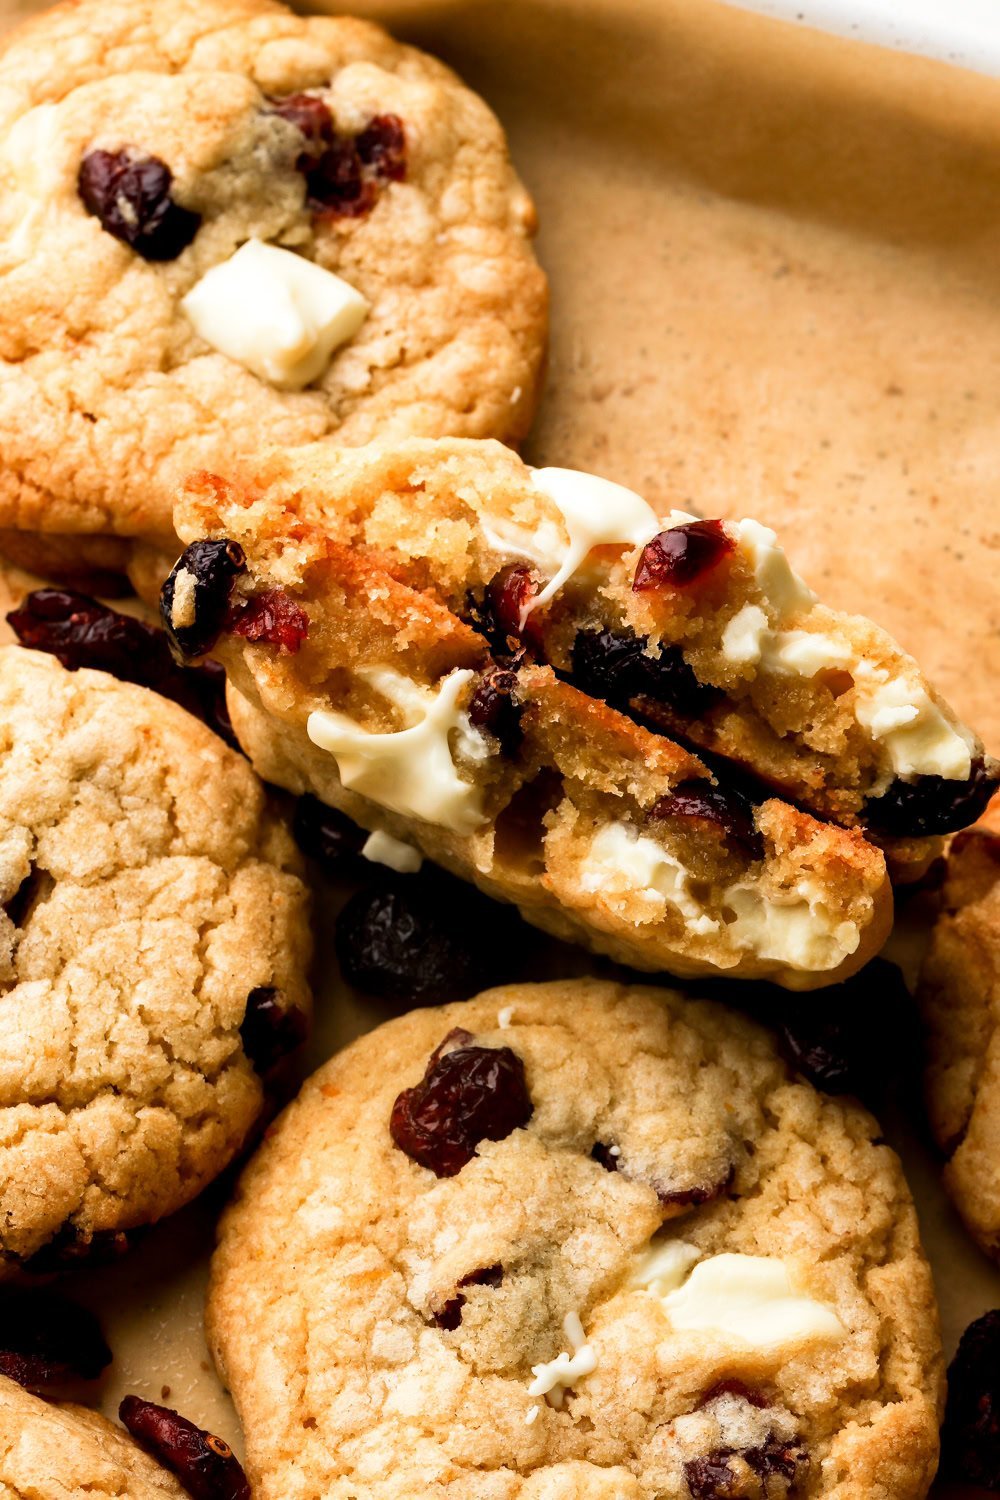
Some of my favorite recipes that use this cookie base are: White Chocolate Cranberry Cookies, Chewy Gingerbread Cookies & Brown Butter Chocolate Chip Cookies.
I’ve even adapted it into a black cocoa version!
Ingredients & Substitutions:
*full recipe is in the recipe card at the bottom!
- Flour: I use all-purpose flour for this recipe, I don’t recommend swapping that.
- Sugar: I use light brown sugar and I don’t recommend reducing it because it can alter the texture of the cookies. You could also use half granulated sugar and half dark brown sugar or all dark brown sugar if you’re in a pinch!
- Butter: I LOVE using salted butter in cookies! You could also use unsalted butter but I would just add an extra pinch of salt.
- Egg: I use large room temperature eggs. Place it in hot water for a few minutes if it’s cold.
- Vanilla: Don’t underestimate the power of vanilla extract in a cookie recipe. I think for cookies, it’s essential.
- Baking Powder: just baking powder, no baking soda.
- Salt: I like sea salt but any salt works, salt cuts some sweetness and really brings out the flavors. If you’re using table salt, feel free to cut back on some since it’s stronger than sea salt.
TIP: I HIGHLY recommend using a digital scale, as dry ingredients are almost always over measured.
Step-By-Step Instructions
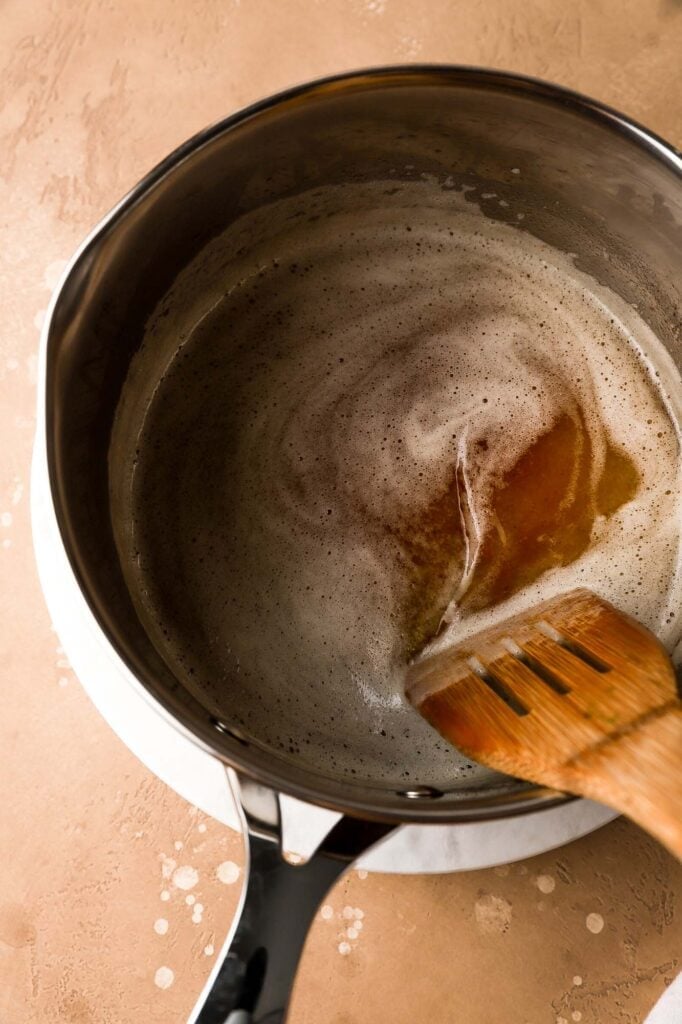
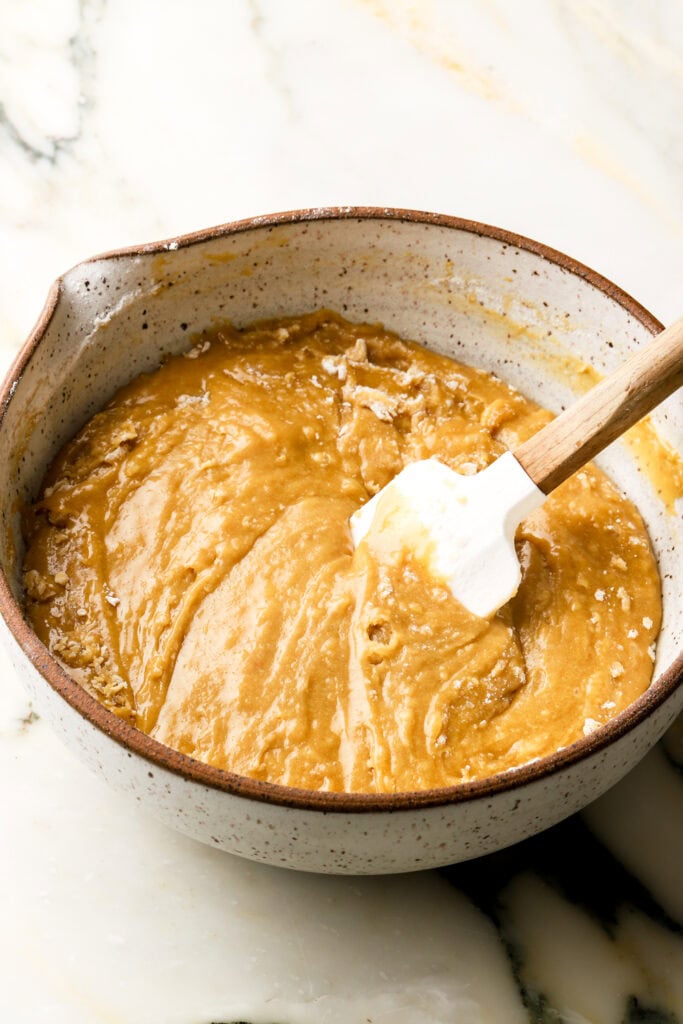
- For the Brown Butter: In a small pot, over medium heat, brown the butter for 5-10 minutes, stirring intermittently until it begins to bubble and foam. Stir continuously until you see the milk solids browning and settling on the bottom. Pour into a bowl and allow to cool for a few minutes.
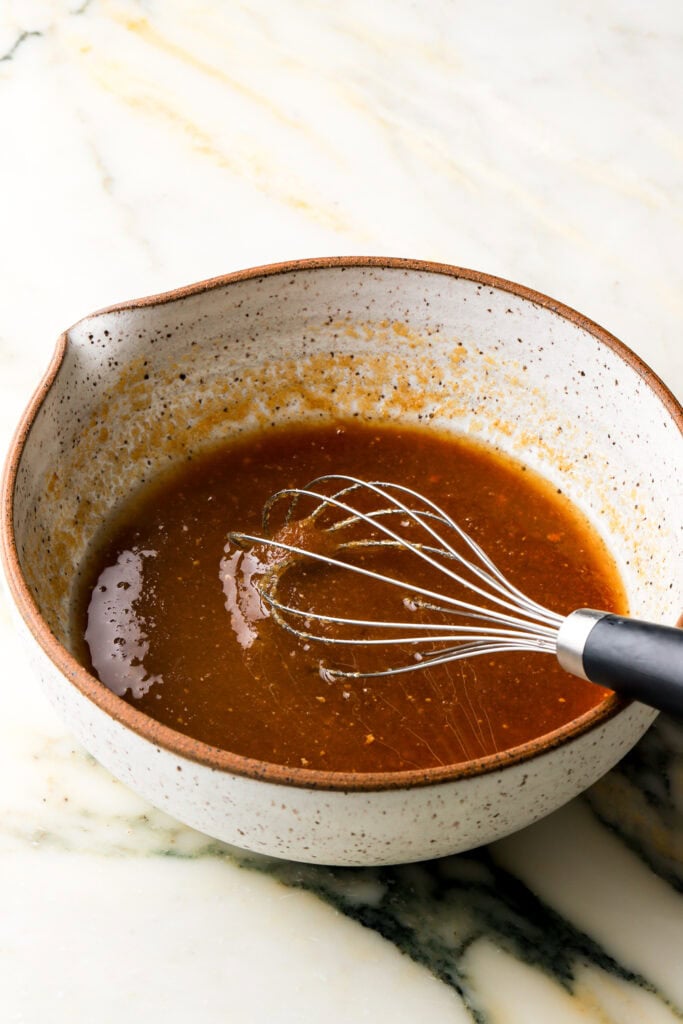
- Place the light brown sugar into a medium-large bowl and add the butter and stir aggressively to cool the butter a little more.
- Add the eggs and vanilla to the butter and sugar mixture and whisk aggressively for 2-3 minutes. You want the batter to lighten in color and get kind of fluffy and ribbon on the whisk when you lift it.
- Add the dry ingredients to the batter and switch to a rubber spatula to fold the flour into the cookie dough just until there are no more streaks of flour.
- Freeze cookie dough for at least 15-30 minutes, or refrigerate for a little longer, so that the batter becomes scoop-able and not runny.
- Scoop sixteen 2ish ounce cookies and place at least two inches apart on a cookie sheet (they spread a good amount).
- Refrigerate or freeze after scooping to let the dough firm up a little more, about 15 minutes. This step makes it so the cookies don’t spread too much. If you’re struggling with that, definitely chill longer here.
- Bake one sheet on the middle rack for 8ish minutes. Then remove from the oven for a second, bang the pan on the counter lightly and use a round biscuit cutter to scoot them around so they’re round.
- Return to the oven for another 4ish minutes, just until the edges are starting to brown and repeat the bang and scoot. Allow them to cool on the pan for at least 10 minutes and sprinkle with flakey sea salt!
Tip: The centers may be puffed and not look fully baked yet but that’s fine, they’ll finish baking as they cool.
Tip: If you like the pale look of these cookies, I recommend baking them on a light-colored metal pan. A dark pan will make the bottoms brown more, which I talk more about in my guide to on baking pans.


How To Bake These Cookies (Convection vs Conventional)?
Cookies are super sensitive to temperature. I actually tested one exact same batch at 325F and 350F and the look/taste/texture was completely different.
I always bake in a convection (fan) oven because my oven runs weirdly hot on the bottom and the fan helps circulate the heat.
I bake my cookies at 325F (163C) convection but this should be the equivalent of 350F in a conventional oven.
I also recommend you play around with your temperature a little, get to know your oven and DEFINITELY get an oven thermometer if you have issues.
If you’re experimenting, here’s some guidelines:
- If your cookies are spreading too much, chill longer and/or increase the temperature of the oven.
- If your cookies are not as spread out and thicker, decrease the oven temperature (and/or thaw them a little if they were frozen).
I like to under-bake my cookies slightly, which means set edges, doughy but not wet centers. Then when you take them out and tap the pan on the counter, they should settle to be more dense and chewy. If they don’t and they stay puffed, they’re over-baked.

How To Get Perfectly Round Cookies
Most cookies bake a little bit uneven around the edges.
To get your cookies perfectly round, as soon as you remove them from the oven, use anything round like a biscuit cutter/cup/mug, etc. to scoot the cookies around within the circle.
Be gentle so you don’t break the soft cookie but you have to be quick and do it as soon as the cookie comes out of the oven, before the edges set.
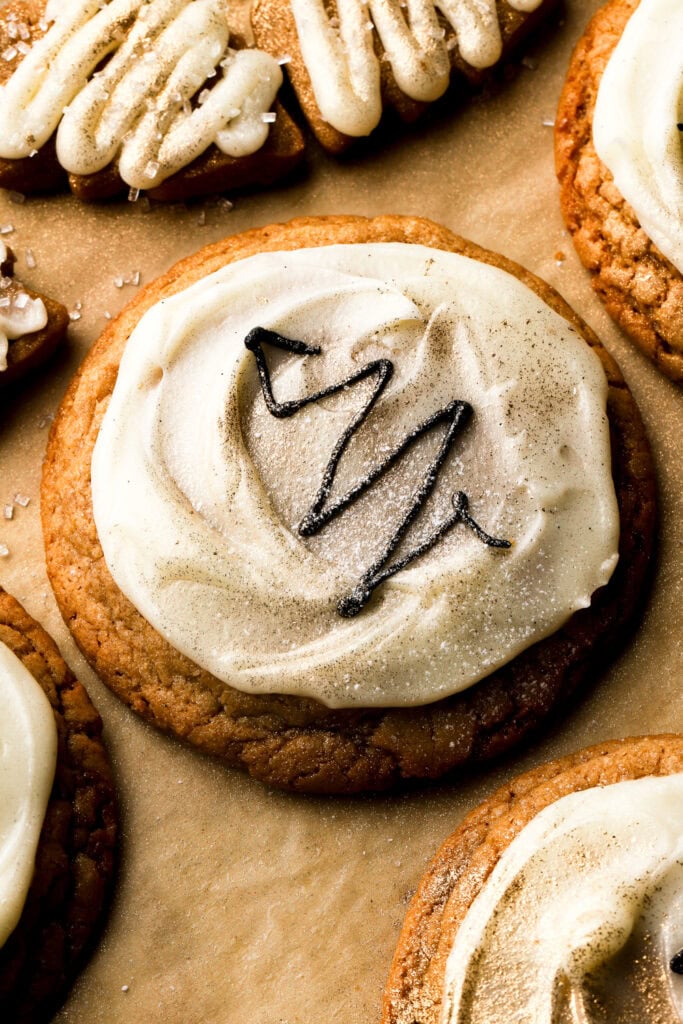
What kind of frosting to use if you want to frost them?
I used cream cheese frosting just because it tastes so good lol. The unfortunate side of using cream cheese frosting is that if can only stay out for a few hours at a time since cream cheese goes bad.
I store them in the fridge airtight and then pull them out 1-2 hours before serving so the cookies aren’t hard.
If you don’t want to deal with refrigerating, you could use a simple powdered sugar and milk glaze, dip them in melted white chocolate or use American buttercream (use half this recipe).
Frequently Asked Questions
The cookie dough is pretty soft so you’ll want to scoop it out, then refrigerate it on a plate or tray until the cookie dough balls are more firm. Then place them in a ziplock bag and freeze. To bake, remove them from the freezer as the oven is preheating and bake 325 F (163 C).
I haven’t tested egg free cookies but you can make these cookies with dairy free butter.
I have tested my base cookie dough recipes with 1:1 substitute for King Arthur and Bob’s Red Mill Gluten-Free Flour Blends. The cookies turn out perfectly, they just have a traditional gluten-free flour flavor which is a little earthy/nuttier.
Of course! Whatever you’re craving today, raisins or other dried fruits, dark chocolate, milk chocolate etc. Or give it a whirl with some delicious homemade praline pecans!
How To Store Cookies
I recommend you place them in a ziplock bag or cookie jar and keep them at room temperature for a few days.
You can put them in the refrigerator to make them last longer, but they will dry out a bit more. I put them in the microwave for like 5-10 seconds before eating if I do this.

Thanks so much for reading today’s post, if you have any questions just comment down below.
If you make these brown sugar cookies, I would love it if you left a star rating for it in the recipe card.
As always, have a blessed day and happy baking!
Love, B

Any particular reason for using baking powder instead of baking soda in this recipe? I’m looking to make chewy cookies instead of cakey ones. Thanks so much! 🙂
Great question! Baking soda usually makes cookies spread and brown more, but either baking soda or baking powder can make chewy cookies depending on the recipe.
I use baking powder here because it gives me the texture I wanted for this recipe. If cookies turn out cakey, it’s usually more from too much flour or over-mixing than from the baking powder itself.
These came out SO delicious! I didn’t have a biscuit cutter so I just used a spoon to lightly tape and reshape if needed after tapping the cookie sheet. Instead of two larger cookies I made 16 1 ounce balls, which required an extra couple minutes to bake. My four year old LOVES THEM!
Thank you for this recipe!
I have cooked these cookies about 5 times already, and EVERY SINGLE TIME they get better and better! This has to be the best cookies my husband and I have ever had. Thank you so much for blessing us with this recipe!
Ahh omg thank you so much! I’m so glad you like them 🤍🤍🤍
Best cookies I’ve ever made. Pretty simple, everyone that has tried them has loved them. I make them for every occasion 10/10
Thank you so much Mimi, so glad you all like them 🙂
Fantastic cookies! I appreciate the measurements by weight! The accuracy and consistency is always better. My family will be eating these again. 👍
What is a gram. I have no idea what you are talking about. Cookies sound delicious but no clue on measurements
Hi Linda, grams are just a weight measurement! I use them because baking is much more accurate that way, and it helps the recipe turn out the same every time. If you don’t have a scale, you can still use measuring cups, there’s a toggle right above the measurements that lets you go between both types of measurements. However, a cheap kitchen scale makes a huge difference, especially for cookies so I highly recommend 🙂
Linda is clearly an indictment of the US educational system
Gram is weight unit used by civilized world.
Fantastic recipe! Delicious 😋
My measuring tools don’t use fucking Grams. Can’t use the recipe if you don’t give actual measure. You expect me to buy a scale and WEIGH my ingredients like some kind of barbaric freak? TF is your problem???
Hi there’s a little button that lets you toggle to cups measurements 🙂
In response to BB: Feedback such as yours tells more about you than recipe. Be a grown up! Your response tells me you’re really too immature to be in the kitchen at all. What a whiner (no, that’s NOT winner misspelled!) To the Baran staff: Thanks for sharing the recipe. Ill be back after trying out the recipe. It sounds amazing!
if only there was some magical device that could convert those measurements for you at the press of a button(s) 😹😹
Yes there is, it’s a toggle right about the measurements 🙂
Imagine being so poorly educated that the metric system makes you blow a gasket, and then bragging about it on the internet
Each typical kitchen scale allows switching units. Just learn how to do use this feature. Unless you use some domestic American made scale – but it probably does not work anyway.
I’ve made this recipe twice now and the flavor is FABULOUS, but my cookies come out tall and fluffy rather than thinner and chewy – any suggestions?
Hi Ashlyn! They’re probably setting too quick in the oven so try lowering the temperature to 325f. Still remove halfway to tap on the counter and then do that again at the end and they should spread more 🙂
They’re alot richer than I expected theyre very good though!!! Although i feel like the salt on top is not needed. I will be making these again!!!!
Hi! I have made this recipe twice, we LOVE them. I am really wanting to try and use cookie cutters, like the Christmas tree ones you have. How much does this change the baking process? Do you recommended a thickness to roll it out to before cutting with cookie cutters? Very curious how you did yours, they are SO cute!!
Hi Caitlyn, so glad you liked these cookies <3 however I absolutely don’t recommend using a cookie cutter for these. They spread a lot so any shape you give them will be dissolved once they’re in the oven.
You can do 2 things though:
1. Make these in a sheet pan (like a cookie bar) and then cut them out after baking.
2. Make actual cut out cookies (which have a differed texture and process) but change the flavor a bit to be more like these.
I’ll link my cut out cookies below. If I were to make those, I would sub the sugar for brown sugar and then sub the yogurt for brown butter, make sure to bring that brown butter back to room temp before starting though. You could also add spices to it like cinnamon, ginger, etc.
https://baranbakery.com/cut-out-sugar-cookies/
Thank you so much for the quick reply! I think I’ll try the sheet pan idea! 🙂
Flavor is great. I’ve made this recipe twice and don’t have a scale, but I’ve carefully measured with scooping into cups and I still end up with too much flour even when I remove some. I will try the recipe one more time with even less flour to see if it does the trick.
Hi Hanna, I highly recommend a scale since all measuring cups are slightly different 🙂
These taste really good!! The only problem i have is that for me instead of coming out as flat cookies they come out as like dome shapes? If you could let me know what im doing wrong that would be great!
Hi Miles, curious if you measured your flour with a scale? If there’s too much flour, you’d get a thicker dough and that would bake up like that.
If you did measure with a scale, try removing the cookies from the oven sooner and banging it on the counter to flatten them, then do that 2-3 times before they’re done baking. & make sure you’re not over baking them, they finish cooking as they’re cooling but if they’re fully baked when they come out, they won’t flatten anymore.
If you’ve done all of these, try increasing your oven temp to 350 instead and baking for less time, that should leave you with crisp edges and more doughy center that should flatten. My oven is weird and I always have to bake cookies at 325f.
These were delicious!!!
So gladly you liked them!
Husband bought brown sugar instead of regular sugar. Looked for recipes to use it up and came across this one. Safe to say these cookies have ruined my life. I am OBSESSED! I’ve already made two batches in week. They are the most delicious things I’ve made and we can’t stop eating them!
Aw hahah well thank God for husbands who buy the wrong ingredients 😂 LOL I’m so glad you like them, they are my cookie obsession too!!
Are these airfryable? Any changes to the directions?
I haven’t tried it but I assume they would be ok if you played around with the temp. I would try one cookie at a time to see what temp works
Great bread recipes!