
Classic Apple Pie
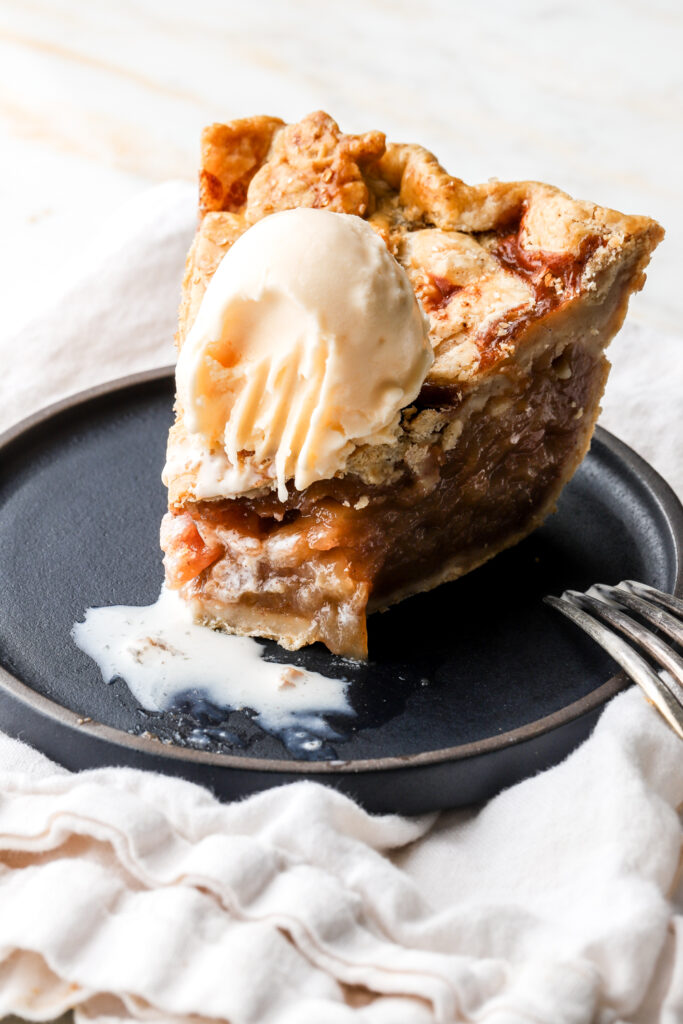
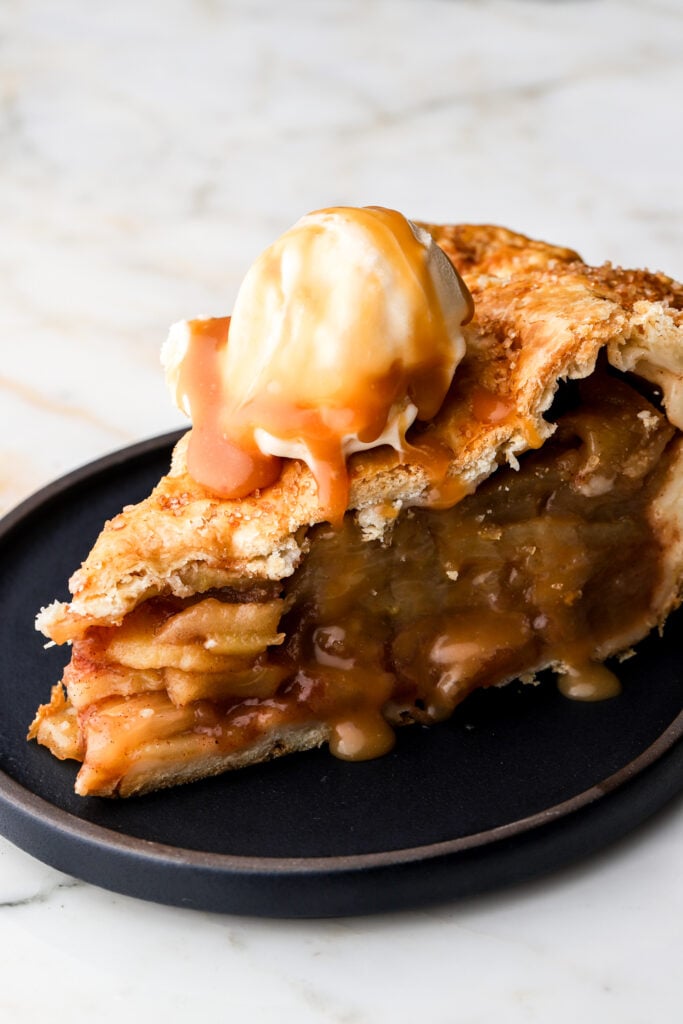
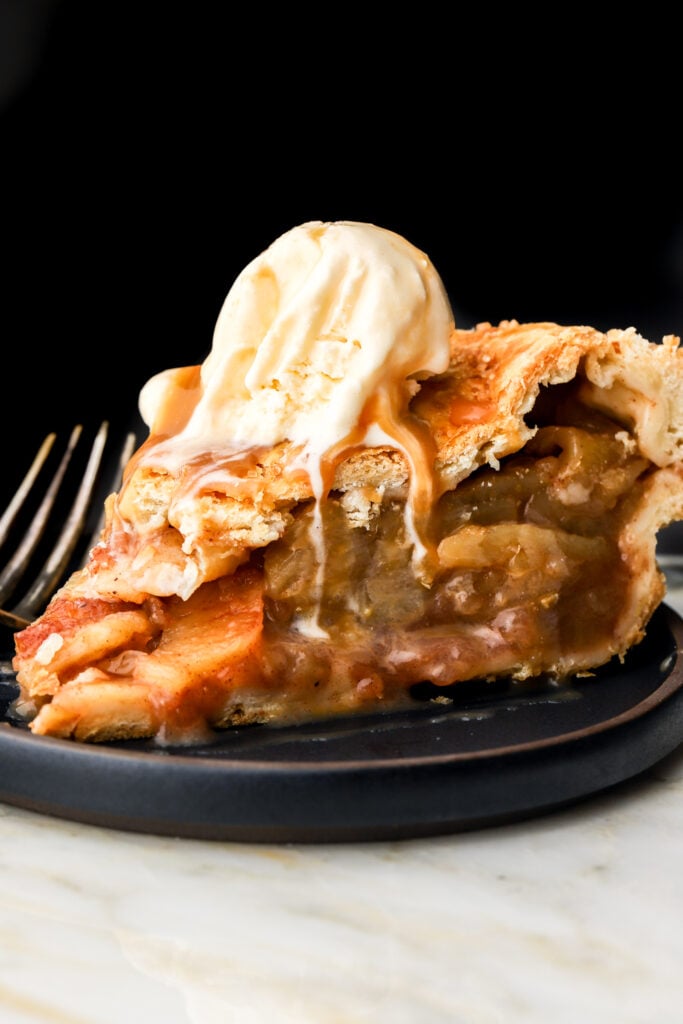
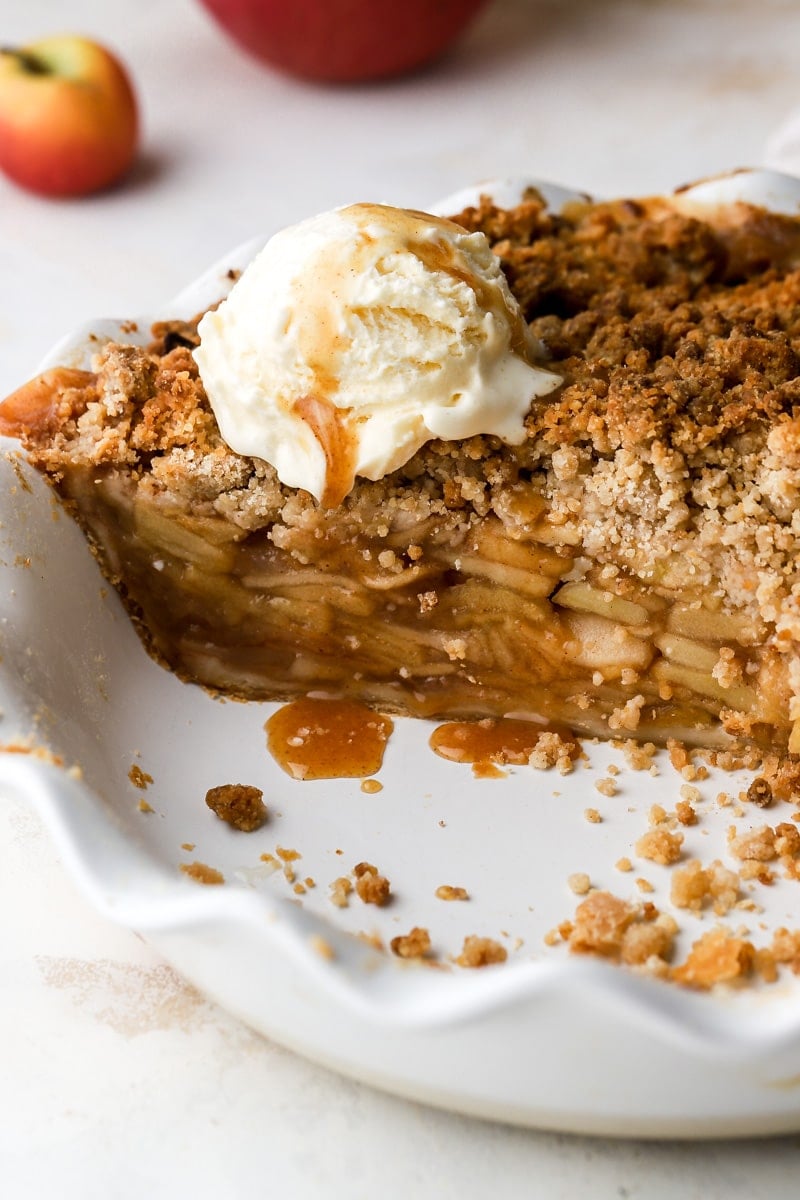
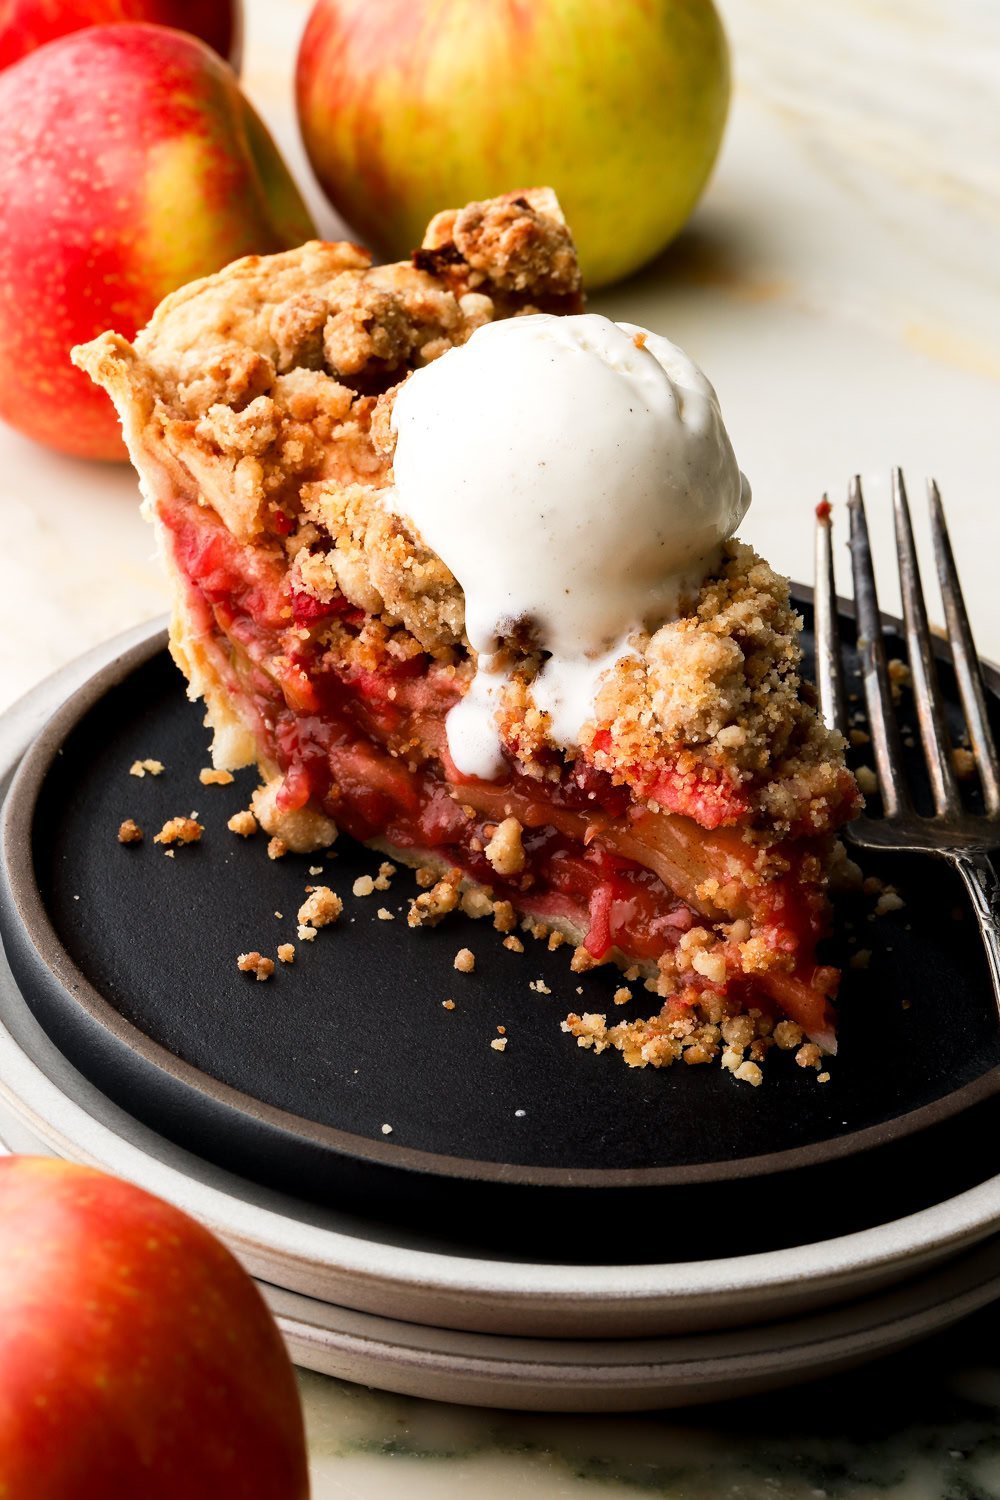
There’s nothing like a classic apple pie. Spiced, tender apples topped with a reduced apple caramel, baked inside of a buttery, flakey pie crust and topped with vanilla ice cream.

There are SO MANY apple pie recipes out there. I mean, it’s a classic, so of course there are. In the past I’ve shared my Momma’s Apple Pie recipe, apple pie with puff pastry and my personal favorite, a dutch apple pie.
Today is the day I’m sharing a traditional apple pie recipe with you all. I haven’t shared one before because I really wanted it to be PERFECT and I tested many, many different versions lol. The method for this apple pie is a little bit more tedious than my dutch or puff pastry version so if you prefer simpler, those can also be baked in a full pie crust like this as well but this version will give you a heftier pie and crispier bottom crust.
Why You’ll Love this Apple Pie Recipe
- No soggy crust here, the apples get heated just for a couple of minutes to release all their juices. Then those juices get reduced down to a syrup to preserve all the flavor but without all the liquid.
- A great make-ahead dessert because it needs a lot of time to cool and set up anyway.
- It’s great as leftovers as well.
- Can be made or less sweet, depending on your style!
Ingredients
- Apples: I used 5 lbs of apples for this pie because I wanted it HEFTY. Apples shrink when they’re cooked so I wanted the pie to be very full even after shrinking.
- I love to use my apple corer to peel, core and slice the apples all in one.
- I used mostly granny smith apples with a few honey crisp in there. I prefer these two for apple pie because they have a nice strong flavor without getting too soggy.
- Cornstarch: used to thicken the juices from the apples so that it gets more saucy and not runny.
- Sugar: to be honest, any kind of sugar works well here but I like to use light brown sugar or a mix of granulated and brown sugar for the filling.
- I think this apple pie is kind of tart and not super sweet. I prefer it this way because I like to top it with vanilla ice cream but if you like it sweeter, use just honey crisp apples (not granny smith) and/or add an extra 1/4 cup of sugar in with the cornstarch, right before baking.
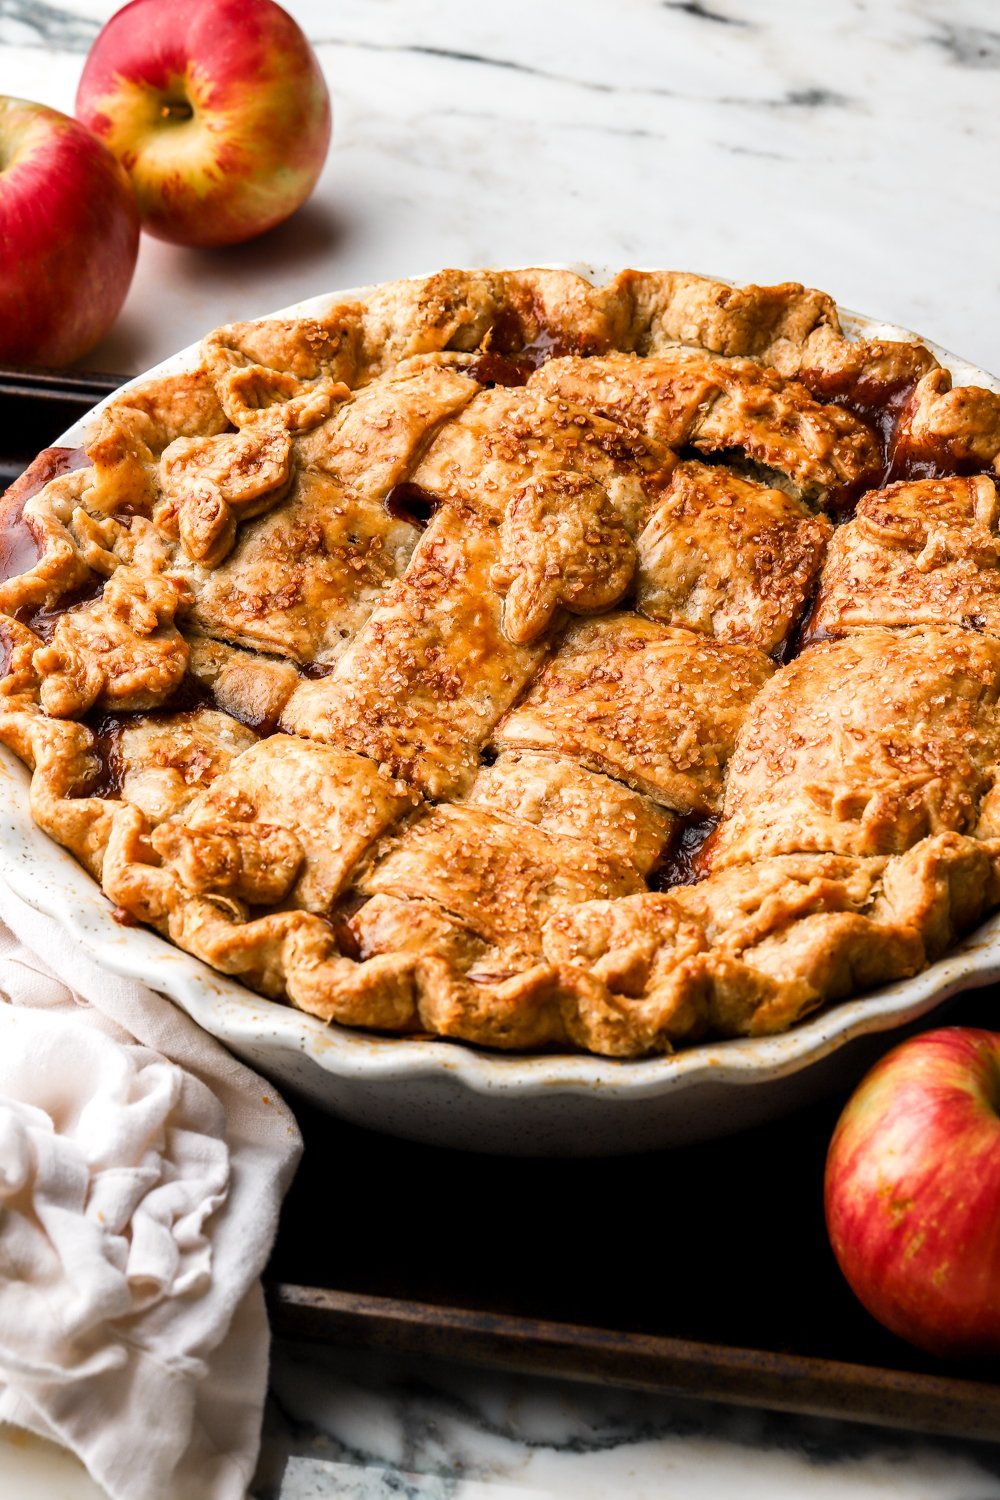
- In the pie with the lattice crust, you’ll see my filling is darker, I used dark brown sugar for that and I added the 1/4 cup extra with the cornstarch.
- Lemon: whenever I bake with apples I like to coat them in lemon juice. This prevents them from getting brown super quick and brings out their natural tartness.
- Salt: brings out natural flavors and cuts the sweetness a bit. I like to use fine sea salt. If you’re using table salt, I would use half the amount.
- Spices: for apple recipes, I generally just do ground cinnamon and a little bit of ground nutmeg.
- Butter: I make my pie crusts with all butter. I love using salted butter but unsalted also works, just add an extra pinch of salt.
- If you’re feeling fancy, browning the butter for the crust takes pies to the next level! You would need to brown more than the recipe calls for to account for the butter lost in the browning process. Measure the amount needed after browning.
- Flour: I just use all purpose flour. There is such a thing as pastry flour and I know some people like cake flour for pie crusts too but all-purpose works perfectly here.
- I also HIGHLY recommend using a digital scale, as flour is almost always over measured.
- Water: make sure the water is ice cold for the crust.
- Alcohol: Never have I ever had a flakier crust than when I added 1-2 Tbsp of alcohol. Because alcohol inhibits the development of gluten, it allows you to add a little more liquid without risking a tougher pastry. My best results were with whiskey, but any type of spirit will work fine and won’t impart any flavor unless you use more.
- This is totally optional and not necessary but definitely recommended to replace 2 Tbsp of the water with alcohol.
Step-by-Step Instructions
The Pie Crust
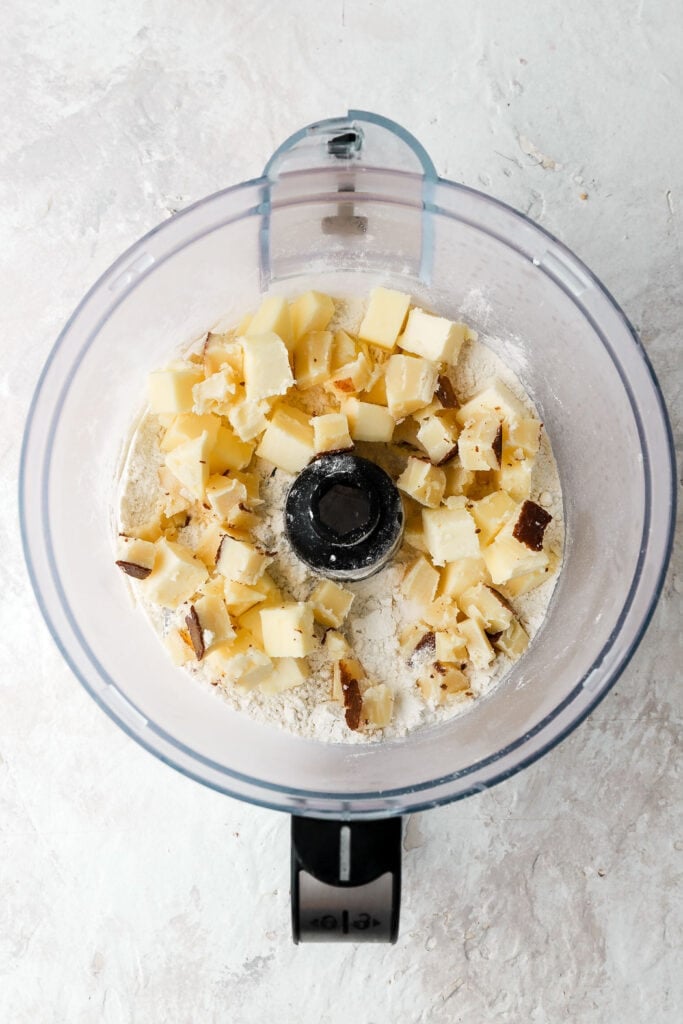
Step 1: Cube cold butter and then place it back in the fridge, measure out flour and place it in the fridge or freezer, measure out water and place it in the freezer for 15 minutes.
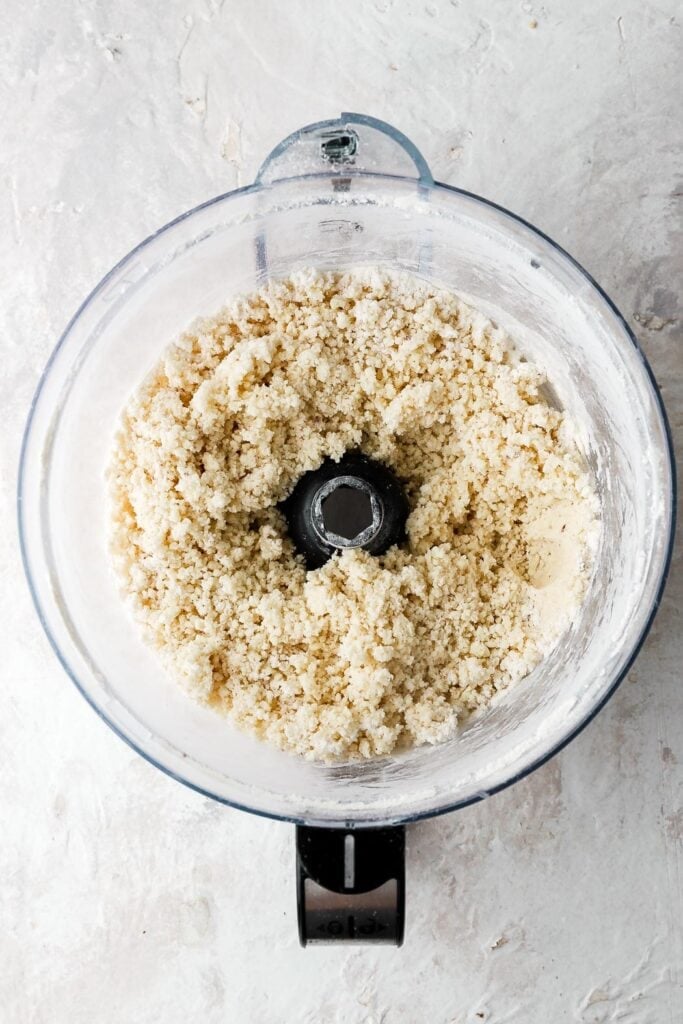
Step 2: Place flour in a food processor and place the cubed butter on top. Pulse for a few seconds until the butter and flour look like small crumbles.
Step 3: Drizzle in half the water and alcohol and pulse, then drizzle in a little more at a time just until the dough starts to look more wet. The dough will still be crumbly but when you press on it, it should stick together.
Step 4: Dump the mixture onto the countertop and use your hands to press it all together and fold it over itself a couple of times so it all sticks together nicely. You should see bits of butter in the dough and it should be fully hydrated (so no dry flour spots) but not too sticky to handle.
If you have dry flour spots, add a drop of water to them, don’t over-work the dough by trying to make it stick together.
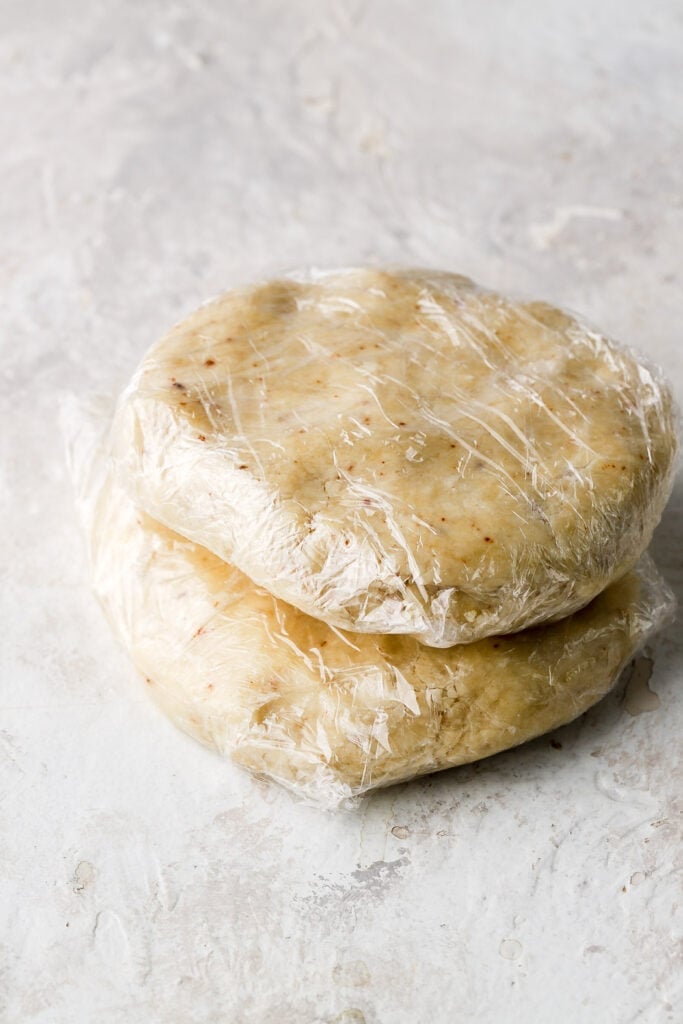
Step 5: Slice the dough in half and form two round discs. Wrap the discs in plastic wrap and place in the fridge for 1-2 hours.
Apple Filling
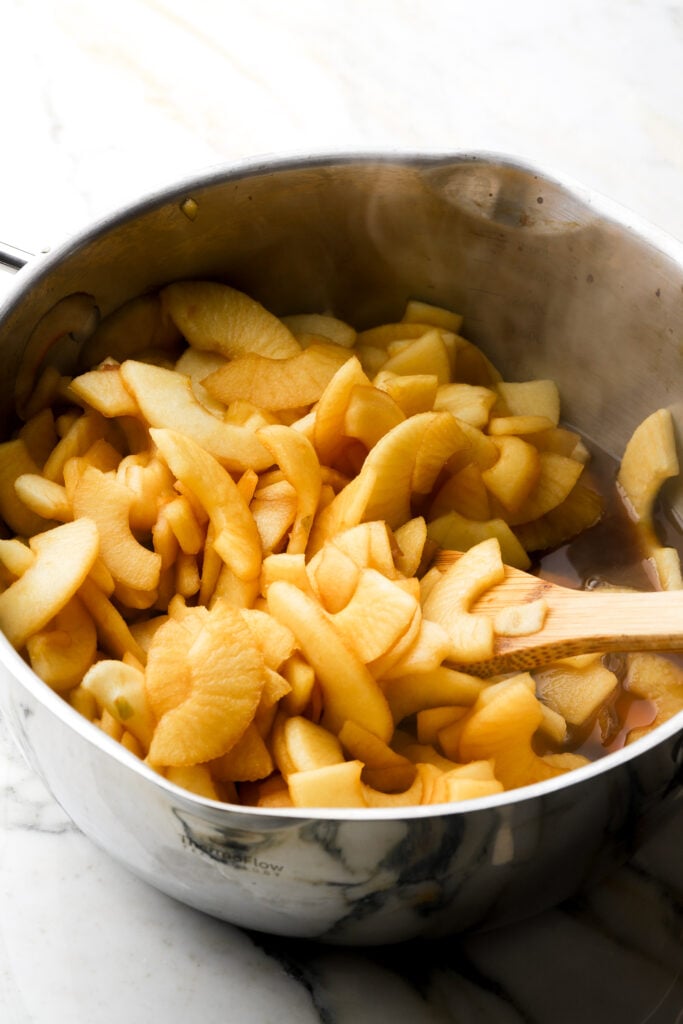
Step 1: Peel, core and slice apples: I like to use an apple corer to make this super quick and easy. Toss them with the lemon and sugar in a large pot and cook over medium heat for 5 minutes, just until all the sugar dissolves and you see liquid at the bottom of the pot. DO NOT cook until the apples get flimsy, this will make them too mushy after baking.
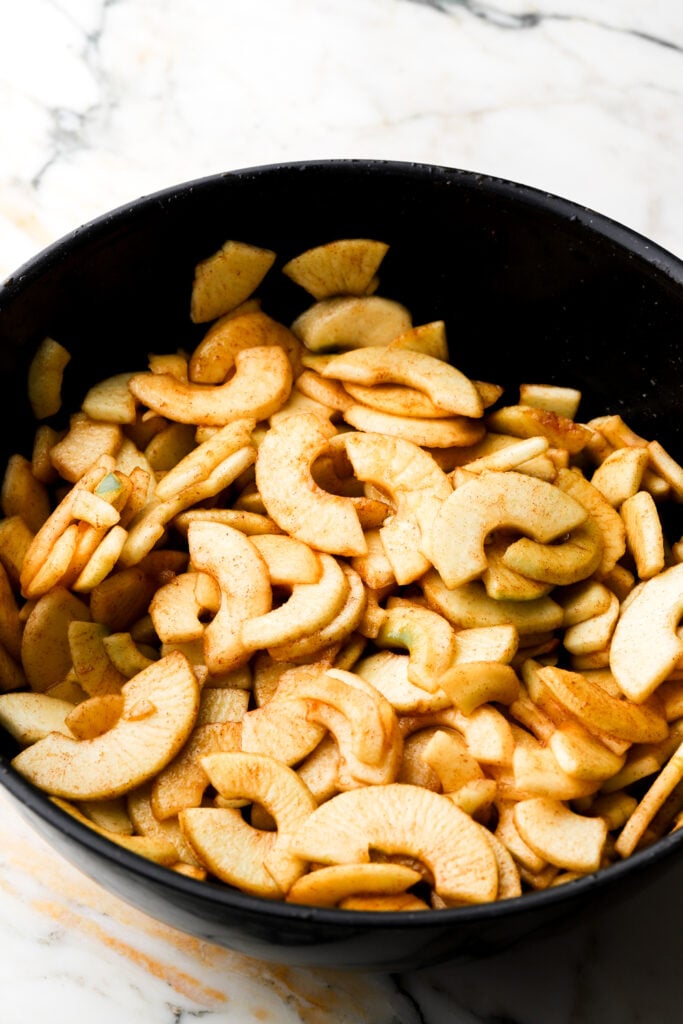
Step 2: Rest the apples with its juices, add the cinnamon, nutmeg and salt and rest for 30-60 minutes. Then strain the apples into a clean large bowl. There should be about 1 cup of spiced, sweetened apple juice left behind.
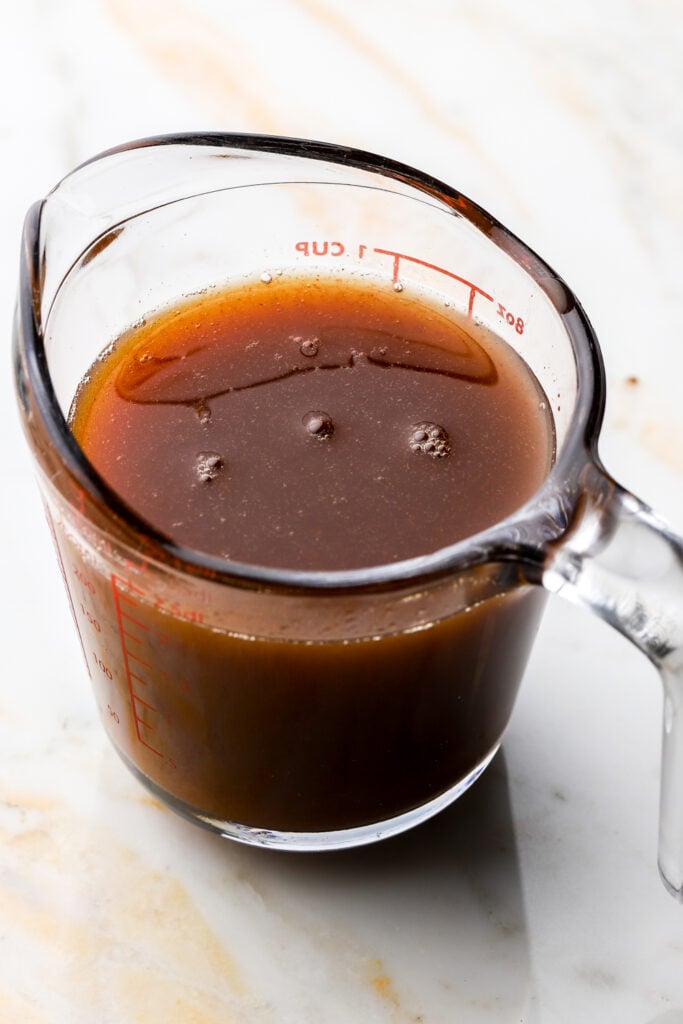
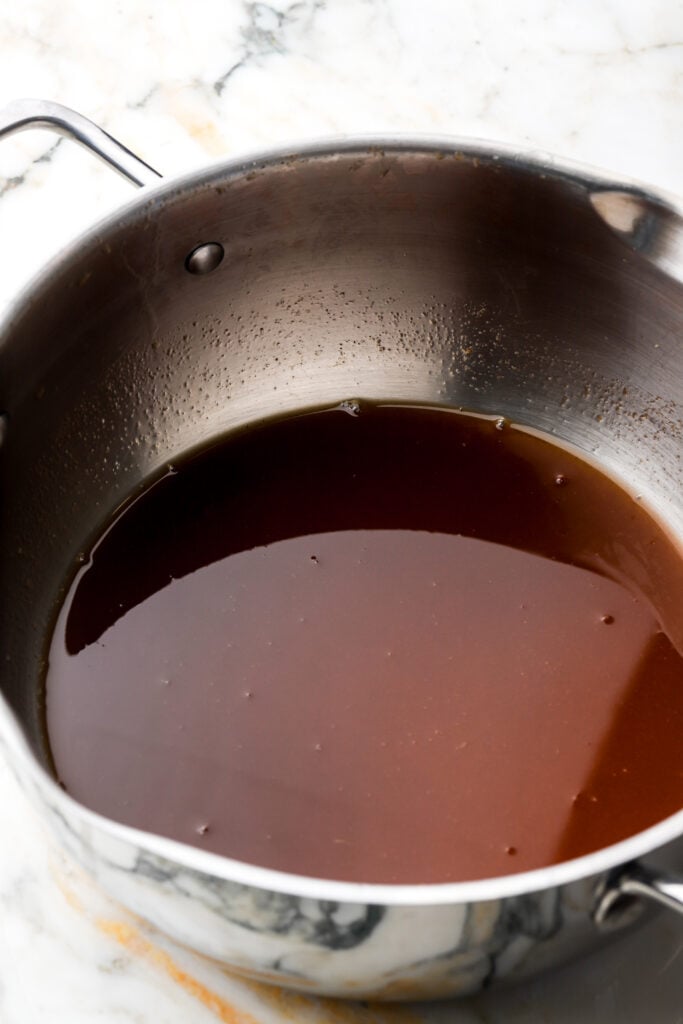
Step 3: Return the juice to the original pot, add the butter and bring to a simmer over medium-low heat. Allow it to simmer for 15-30 minutes, until it’s reduced by 50%. You should be left with about ½ cup of juice (4oz/120mL). The juice will turn into a thick syrup. Pour it into a heat safe bowl and place it in the fridge for a few minutes.
Step 4: Toss apples with cornstarch (and extra sugar if using) until it’s evenly distributed. *Since it’s been about 30 minutes of the syrup cooking, the apples will have released a little more juice, I strained this out and discard before tossing with the cornstarch.


Assemble
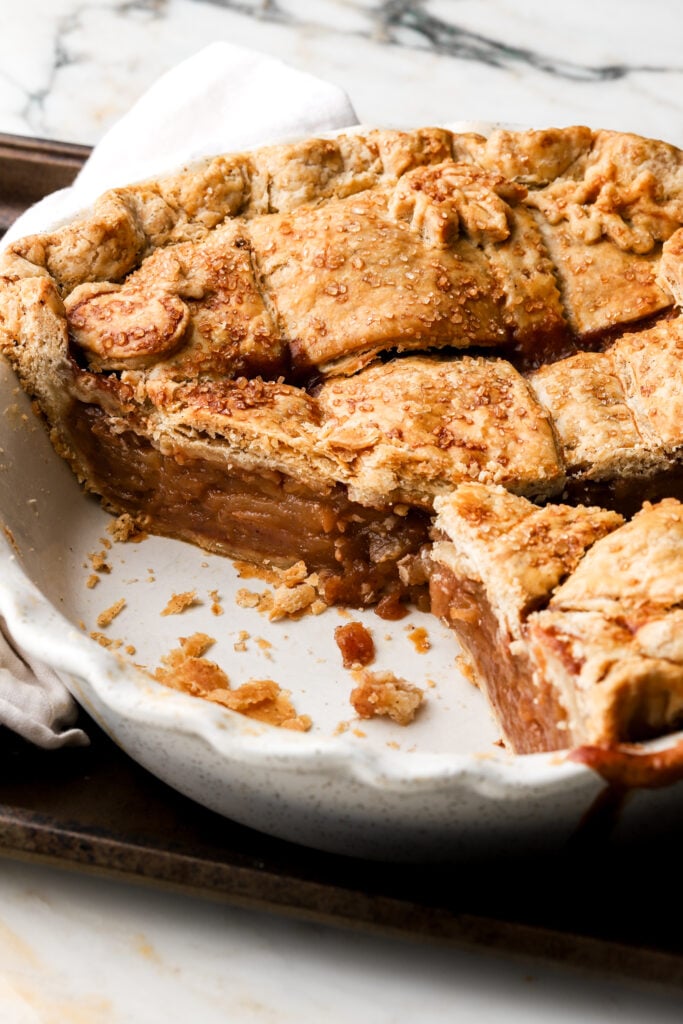
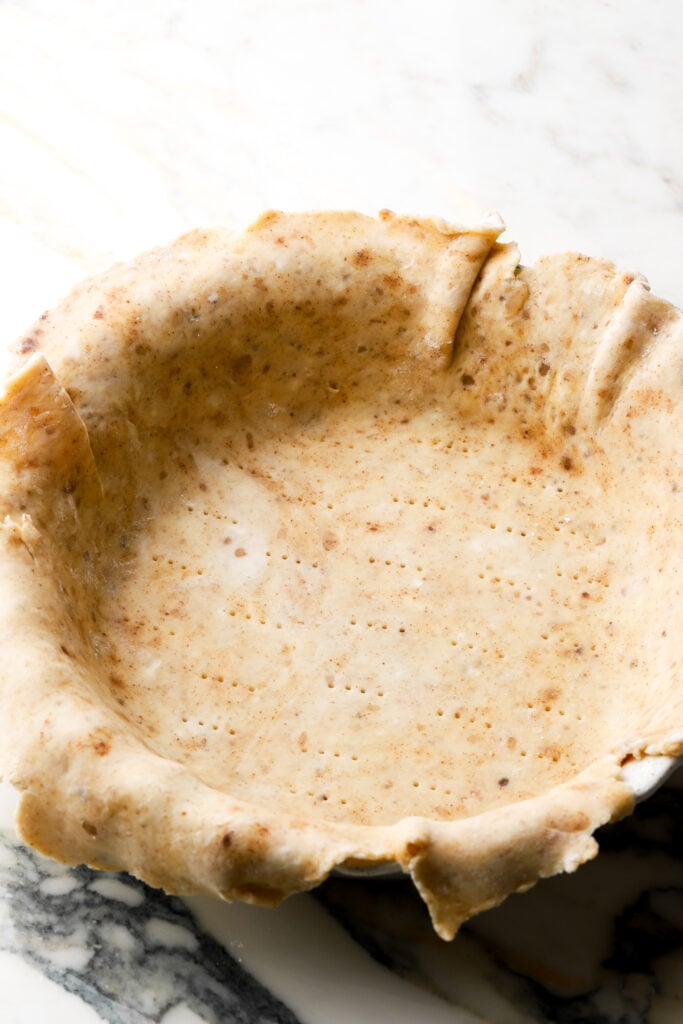
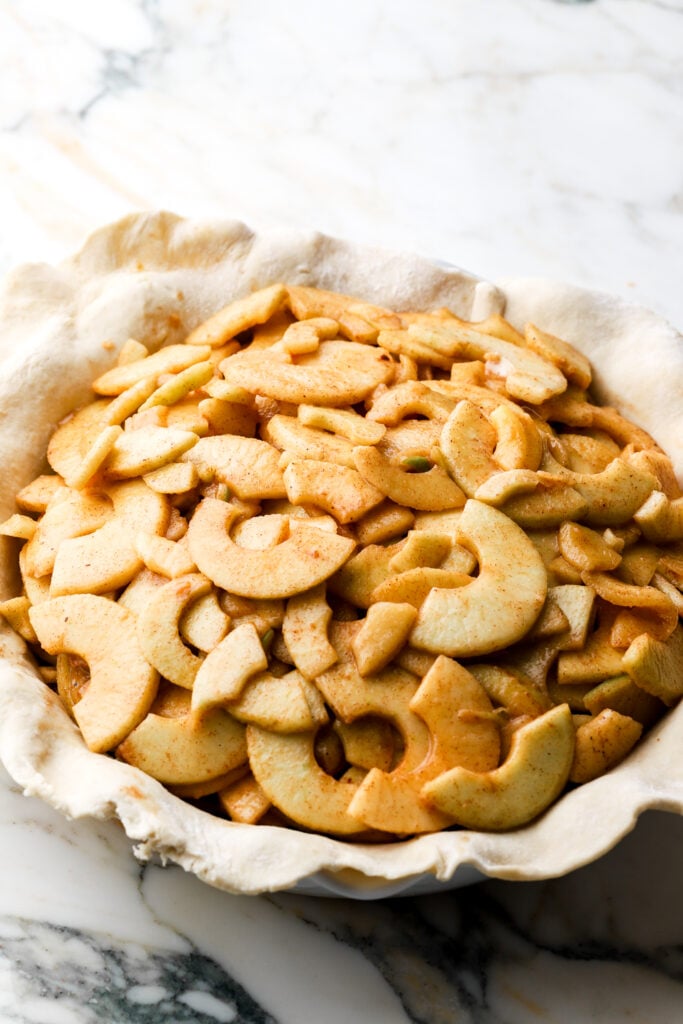
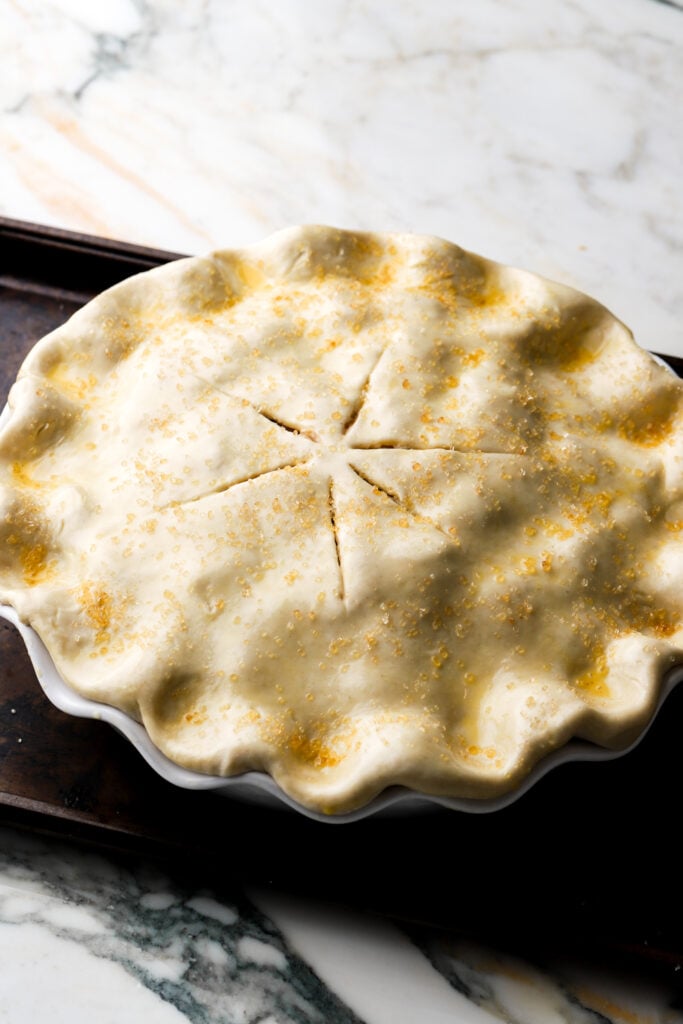
Step 1: Roll out the crust to fill a deep dish pie pan. Place the bottom crust in the pan and dock the bottom of the crust. Arrange the apples on the bottom crust evenly, trying to eliminate any gaps between the apples.
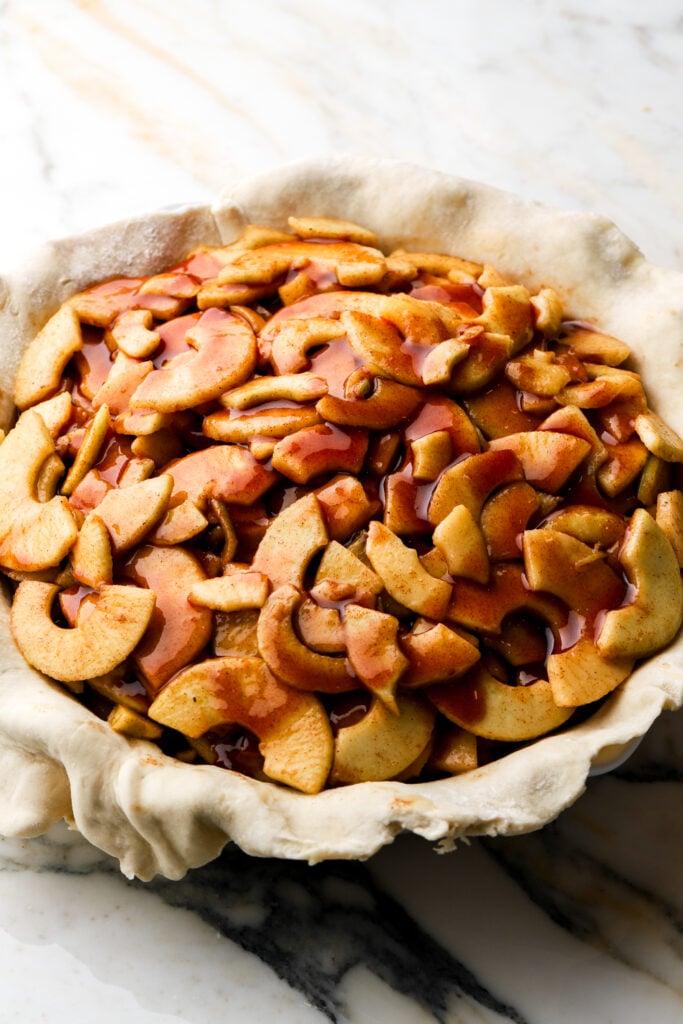
Step 2: Pour the reduced apple juice on top of the apples evenly.
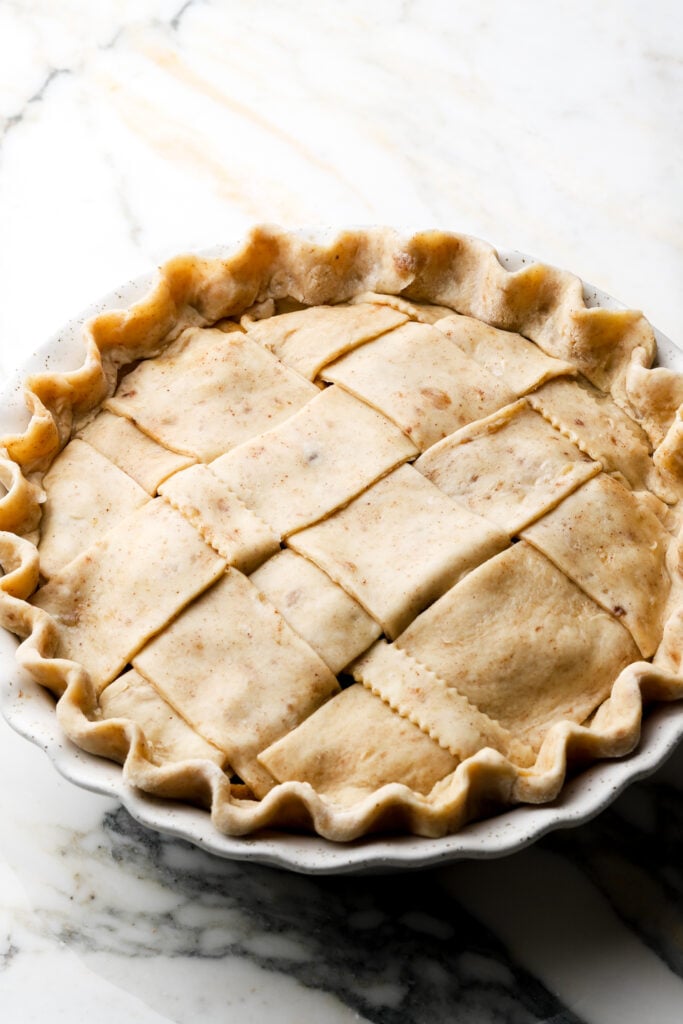
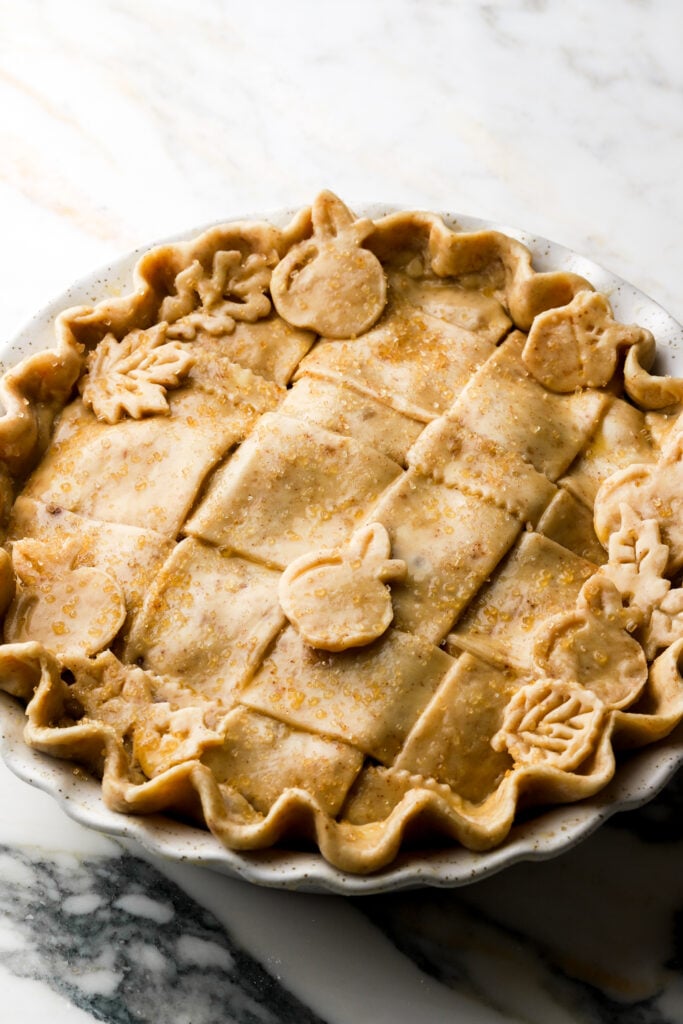
Step 3: Roll out the top crust. You can do a lattice crust or leave it round and whole. Pinch the edges together to get a good seal between the top and bottom crust. I like to leave the bottom crust a little longer than the top and then fold it over the top crust. Refrigerate for at least 30 minutes or freeze for at least 15 minutes, until it’s firm. Preheat the oven 425F.
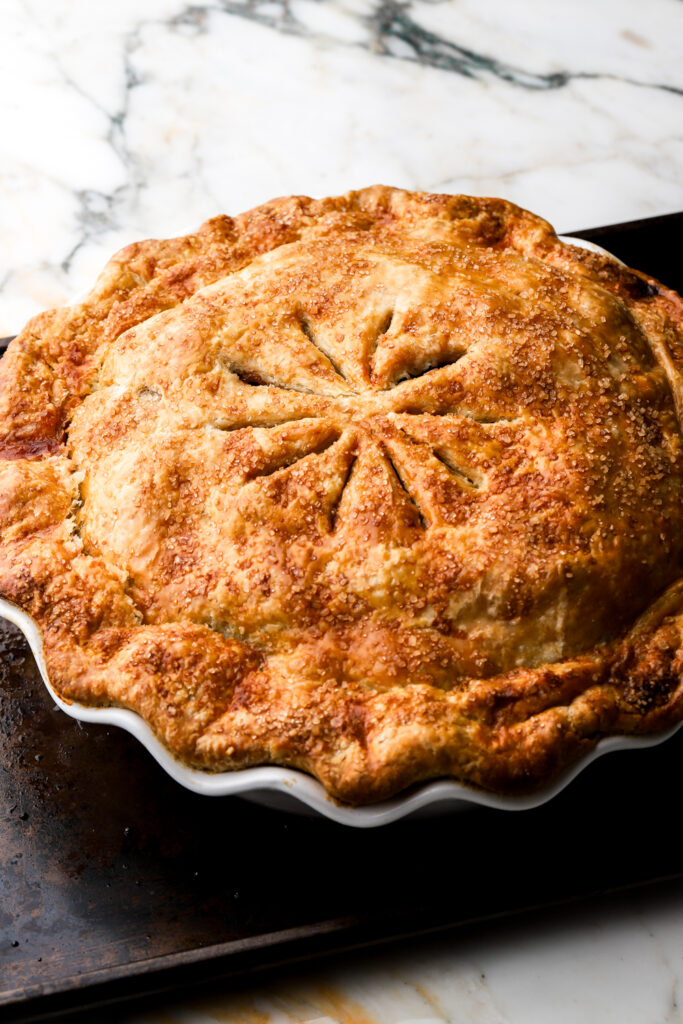
Step 4: Bake the pie uncovered on the bottom rack in a conventional (no fan) oven for 15 minutes. Reduce the oven temperature to 350F (177C) and bake for another 50-60 minutes. The juices should be bubbling through the top slits of the crust. Feel free to also cover the edges/top with foil if they’re browning too quickly.
Step 5: Allow the pie to cool for a few hours before serving with ice cream and salted caramel sauce.
*to get clean slices, you’ll have to refrigerate it for a while as well.

Tips for getting the pie crust just right
- Temperature matters: to create a flaky crust, you want the butter to be cold so it doesn’t melt into the other ingredients. To keep the butter as cold as possible I like to put my flour and sugar in the food processor bowl and then freeze the whole bowl while I cube my cold butter.
- Add the butter to the bowl and freeze while you measure the ice cold water. For ice water, I just put 1-2 ice cubes in the cup and then measure the water or measure the water and freeze it for a few minutes.
- Temperature matters again: Refrigerate the pie dough after you’ve made it and once it feels a little more firm, about 30-60 minutes later, you can roll it out. I roll out half at a time (so the bottom crust first and then the top crust) so the other half doesn’t get too warm.
- If you’re making designs with the top crust and it starts to feel sticky/soft, just refrigerate it again for a few minutes.
- Temperature matters one more time: You want the pie crust and the streusel to hold their shape while they’re baking. If you bake room temperature pie dough, the butter will melt right out and the crust will shrivel up. The streusel will melt into one nice big streusel chunk lol.
- What you want to do is, once the pie is all done, pop it in the fridge or the freezer for about half an hour before baking. You want the crust to be firm and cold before baking so that it holds its shape.

How to roll out pie dough
When I refrigerate my pie dough for 1-2 hours, it is firm but it’s still malleable and able to be rolled out. If your pie dough feels rock solid, let it rest on the counter for a few minutes until it’s able to be rolled out without cracking.
The dough should not be super sticky so just lightly flour the countertop and the top of the dough. Place the rolling pin in the center of the pie disc and roll out almost to the edge of the pie but don’t go past the edge. Then turn the dough 90 degrees and repeat until it’s about ⅛ inch thick and large enough to fully cover your pie dish.
You can either roll the dough around the rolling pin and unroll it over the pie dish or I like to gently fold the dough in half and then fold it in half again and then unfold it over the pie dish.
How to make a lattice pie crust
Honestly, this is so difficult to explain with words lol so I’ll include a little timelapse video below.
Basically you’re going to roll out the top crust and then slice it into strips. You can make these strips however thick or thin you’d like. The strips then get layered vertically and horizontally, weaving the strips together.
I wanted very thick strips with no spacing between because I thought it would look pretty but keep in mind, if you do it like I did, the pie doesn’t have breathing room lol so it may tear in the weakest spots to release the filling (bubbling on top). So if your lattice strips have space between them, that is better for you pie.
I re-rolled my leftover dough to make some decor – keep in mind, re-rolling the dough and reusing it can make it tough. I still do it because it’s very few decorating pieces and no one notices that it’s tougher lol.
Pro Tips for making apple pie
- Do not skimp on the apple resting time. The sugars draw out the liquid from the apples and letting them rest before baking will eliminate a lot of the juice that can make your bottom pastry soggy.
- Make it hours in advance or the day before serving because it is much easier to serve once it’s cooled and it takes a few hours to cool.
- 10/10 recommend an apple corer to make all your fall baking 10x quicker. This apple corer peels, slices and cores the apples all at once. I use it for ALL my apple recipes.
What type of pan is best for pies
I prefer to bake pies made with pastry in a metal pan. Metal pans conduct heat the quickest and most efficiently. Your crust will most likely have the best bake using a metal pan.
That said, I don’t always bake my pies in metal pans because my metal pan is quite shallow and I don’t have a deep dish metal pan so I use my ceramic ones for things like deep dish apple pie and it works fine with a few insurances.
I always make sure to bake on conventional (no fan) and not convection and I like to place it on the bottom rack so that the bottom pie crust gets direct heat. I also always place my pie dish on a metal baking sheet to catch any drippings.
I haven’t tried it but some people recommend using a baking stone underneath the pie dish to bring more heat to the bottom of the pie.
When you’re baking a more hefty, wet pie like traditional apple pie, you can sprinkle some sort of starch, like flour or cornstarch on top of the bottom pie crust to help absorb more of the filling juices. I actually haven’t done that with this one because reducing that sugar on the stove really helps with the moisture and I’ve always gotten a beautiful baked bottom crust even with the ceramic pan.
For this apple pie, you want a deep pie dish; I used my Emily Henry ceramic one and haven’t had any issues with the crust not baking in this recipe.
Frequently Asked Questions
I find that most apples work well in desserts except golden apples (those are too mushy). I really love using a mix of granny smith and honey crisp, you get a nice tart and sweet flavor that’s not too mushy. I’ve also used gala apples but sometimes those can be softer/prone to breaking while mixing as well.
I find the skin a little unpleasant so I definitely recommend it and it’s easy with an apple corer.
Yes you can use store bought pie crust but I don’t know if it’s just me, I always feel like store bought pie crusts have a slightly bitter taste? But it will definitely work for this recipe. However I always recommend a homemade pie crust.
Yup, you can use a dairy free butter or shortening to make the pie crust.
I haven’t tested it but I’m sure a 1:1 gluten-free flour would work fine for the pie crust.
If your apple pie filling is runny it could be from a few things.
– Not giving the apples enough time to rest and excrete the juice.
– Not cooking down the apple juice enough – it should be reduced by 50% and turn into a syrup.
– Not measuring the cornstarch accurately – I always recommend a digital scale, especially for dry ingredients like cornstarch.
Most people opt for simple vanilla ice cream. If you’re feeling fancy, you can make my super delicious cinnamon roll ice cream.
It just needs a little more hydration, add another 1-2 Tbsp of water at a time until it forms a dough.
Your pie crust can crack when you go to roll it out if it’s not fully hydrated (see above) or if it’s too cold when you’re rolling it out. Just leave it out at room temperature for a few minutes before rolling.
The pie dough can leak butter if it wasn’t fully chilled or if the chunks of butter are too large in the crust. When you blend the flour with the butter, you want pea size chunks or smaller.
The pie will shrivel up and shrink when it’s baking if it wasn’t fully chilled before baking. You want the pie crust to be cold so the butter is firm when it goes into the oven.
The dough was overworked. You want to handle it as minimally as possible, once it comes together, let it be, refrigerate it and when you roll it out, use it. Don’t re-roll it out.
As I mentioned earlier, I do this because reducing the sugar with the apple juice eliminates unwanted moisture so we don’t get a soggy crust but it preserves the sweet apple flavor.
I didn’t do this in my dutch apple pie or my puff pastry apple pie and they are still good and although those crusts are fully baked, they are not as crispy as this one so it is optional but make sure if you are following all the steps except that, you should add in sugar like I did with the other recipes.
How to serve and store apple pie
I recommend serving the apple pie on a plate and then topping with ice cream so the ice cream doesn’t melt all over the pie that’s not getting eaten.
Store the leftover pie covered in the refrigerator and then bake for 10-15 minutes at 325F (or microwave) before serving again.
If you freeze it, the pie crust can get soggy when it’s defrosting but it’s definitely still edible.
Thanks so much for reading today’s post, if you have any questions just comment down below.
If you try my apple pie recipe, I would love it if you left me a review!
As always, have a blessed day and happy baking!
Love, B

I just made the Classic Apple Pie recipe from Baran Bakery, and it turned out amazing! The flavor combination is perfect, and the crust was so flaky. Thank you for sharing such a delightful recipe! I can’t wait to make it again for my family.
This is a fabulous apple pie! The apple reduction really makes a difference. I also love the substantial amount of apples- it’s a tall pie! I will say to put a cookie sheet underneath your pie in the oven to catch the drips. Also, I added a 1/2 tsp of cardamom in along with the cinnamon and nutmeg and it was a delicious addition!