
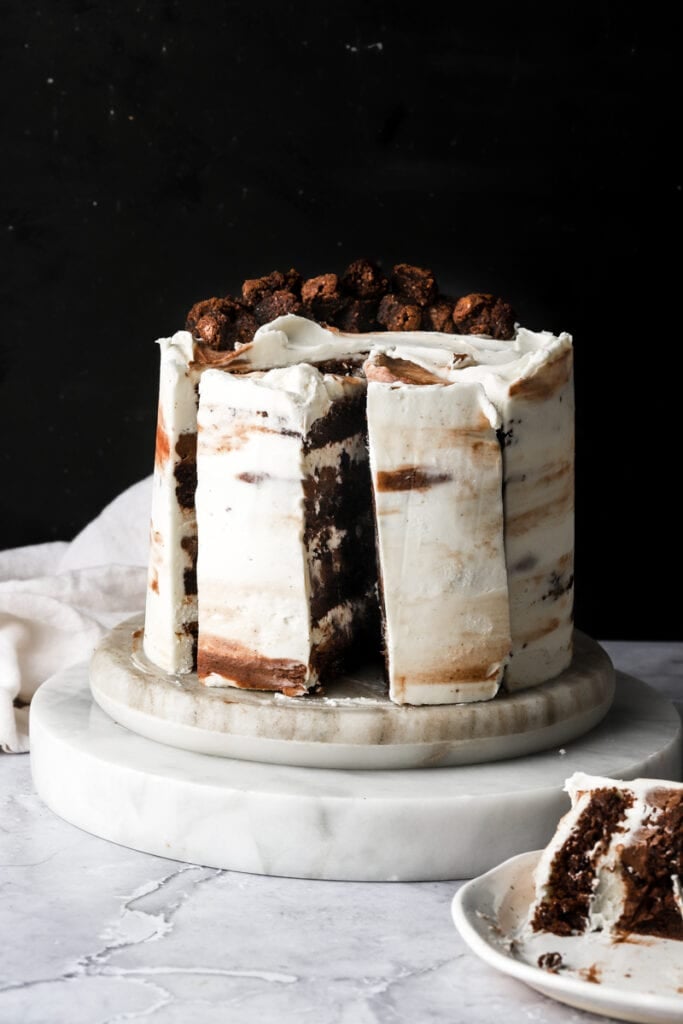
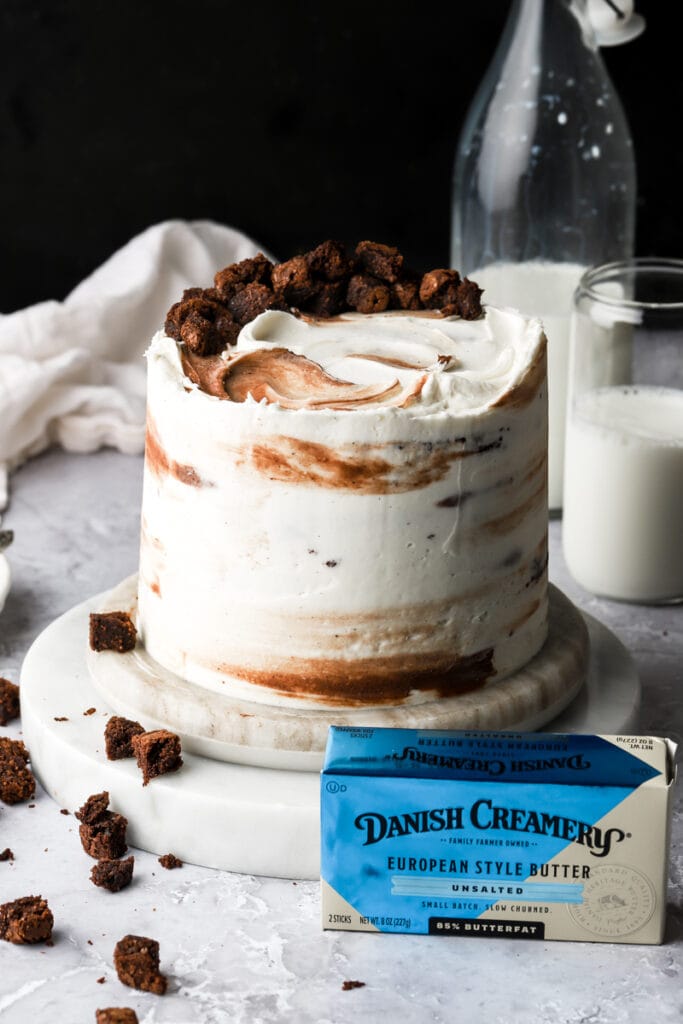
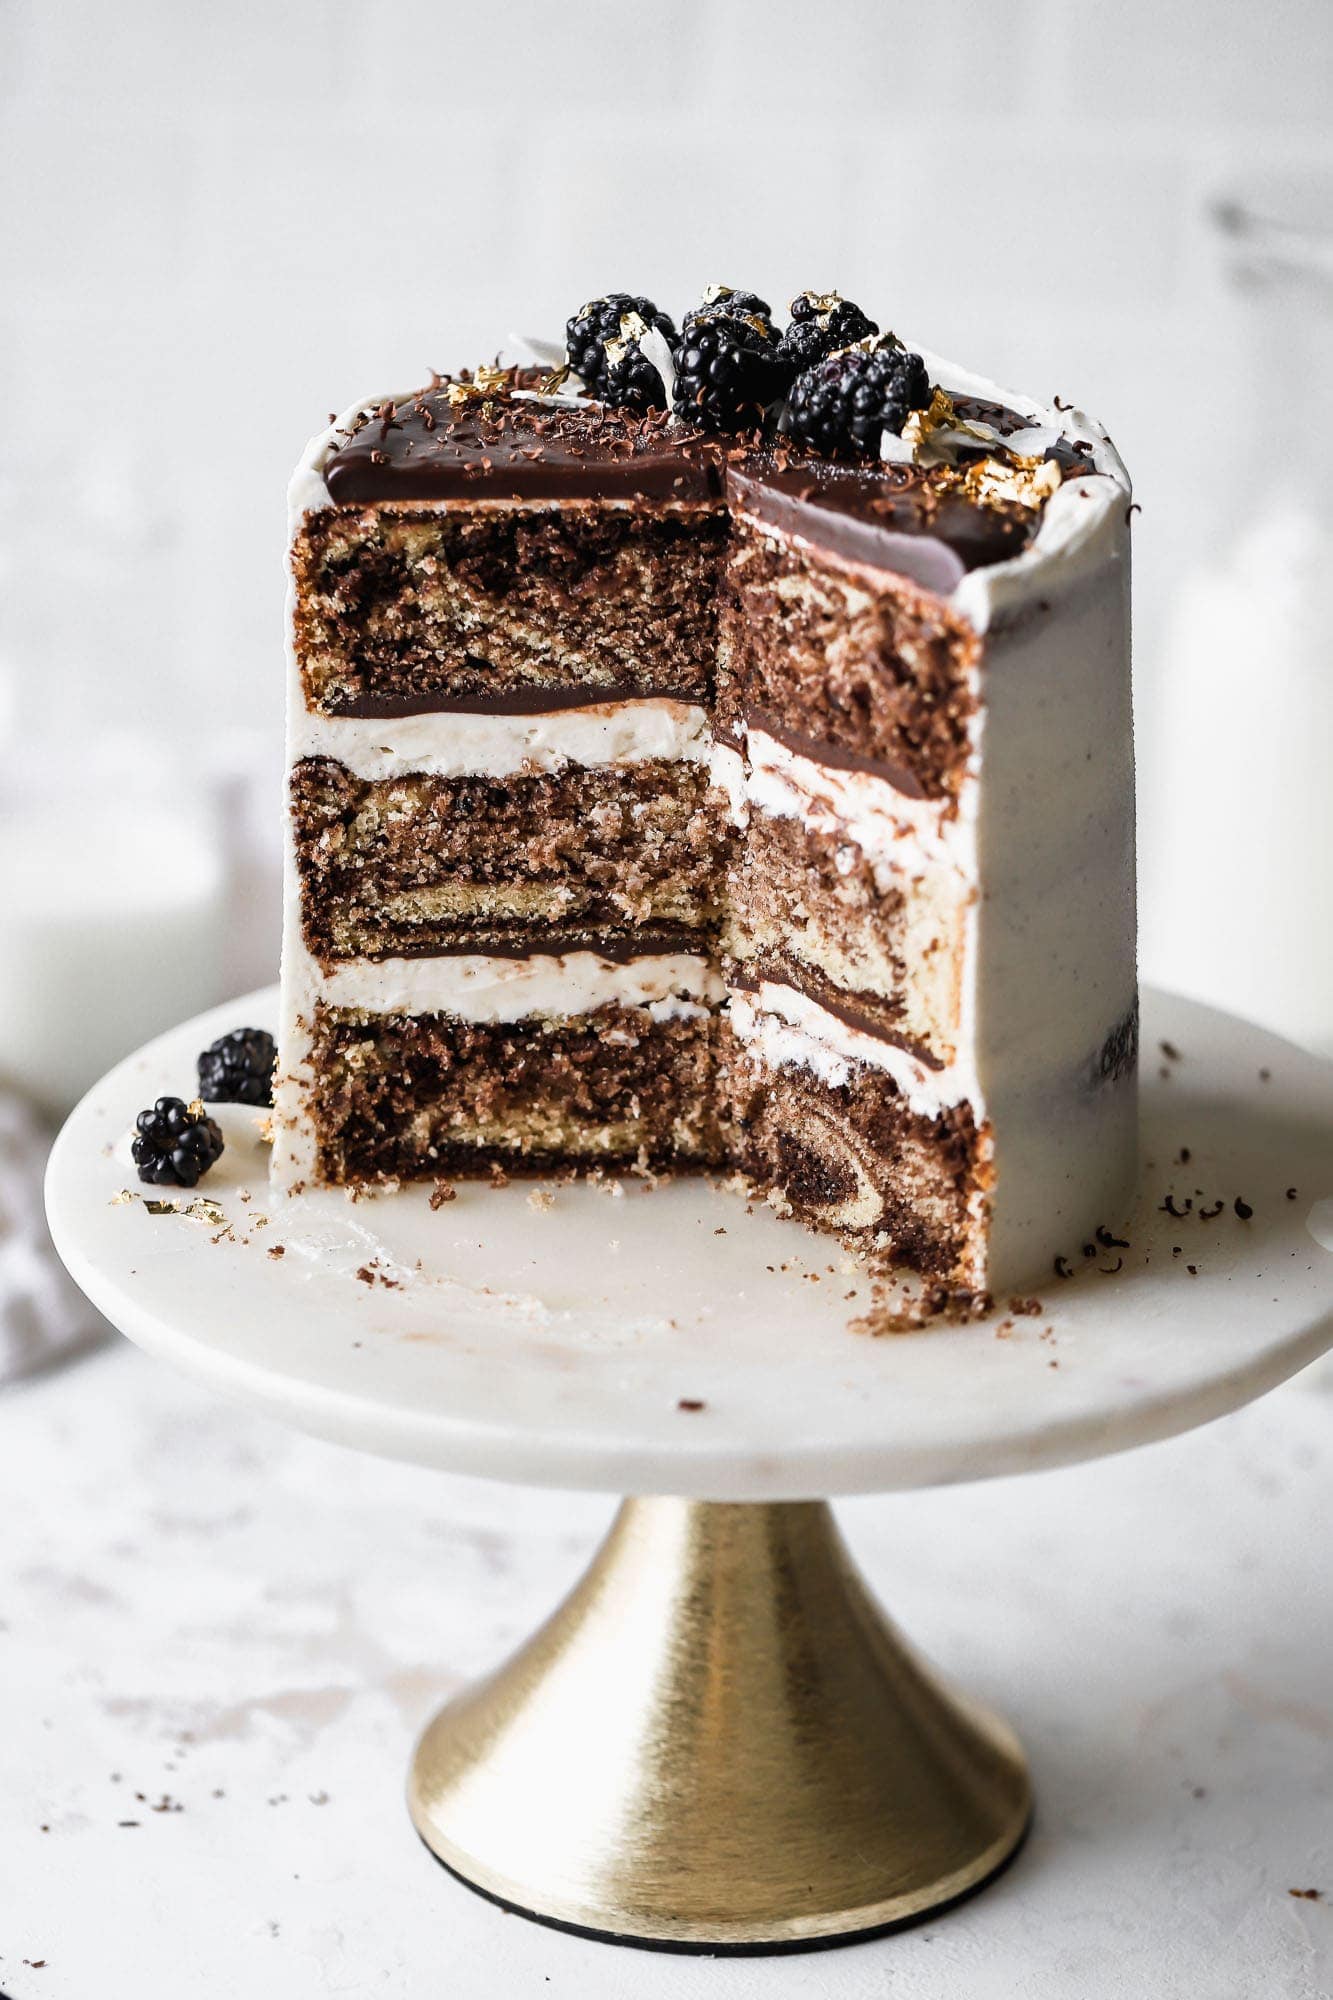
The Ultimate Brownie Cake
The ultimate chocolate brownie cake made with fudgy brownies frosted with whipped chocolate and vanilla cream cheese frosting and more brownie chunks in between.
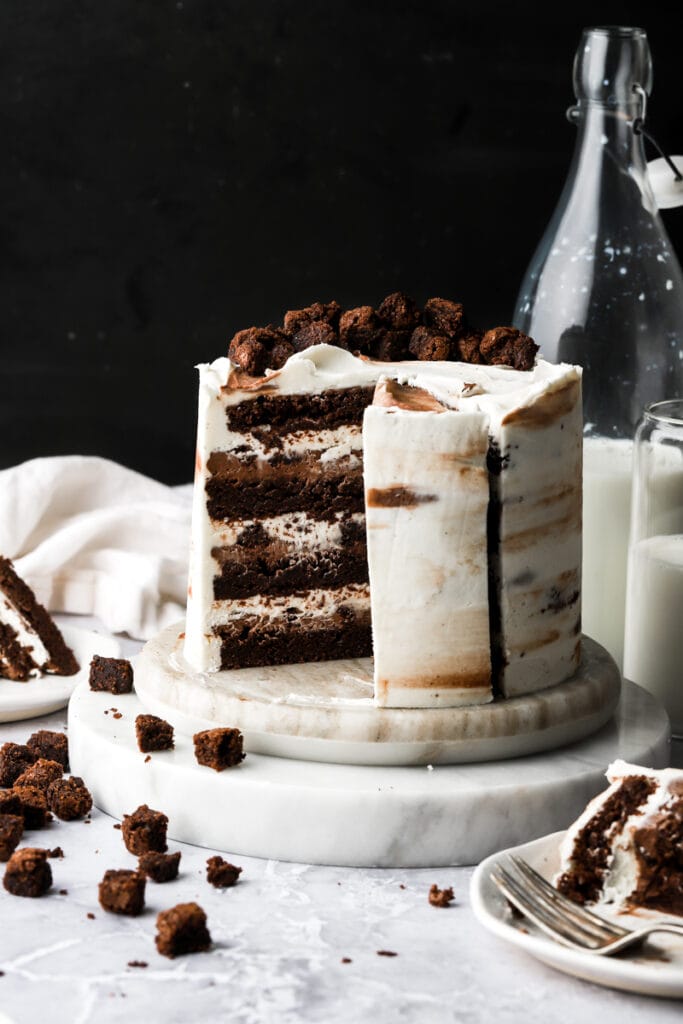
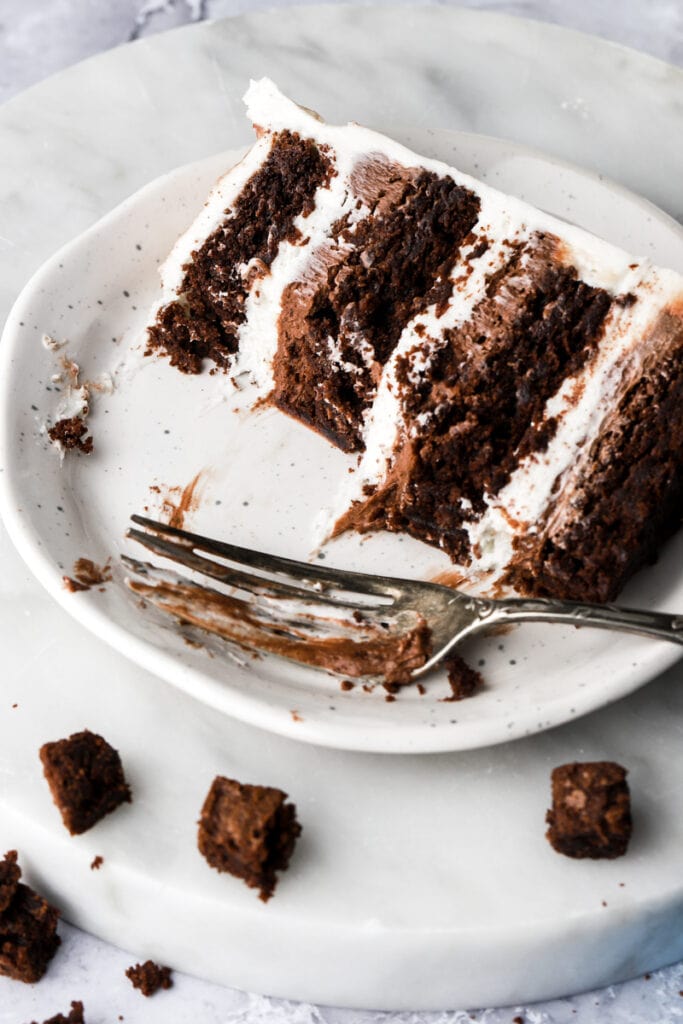
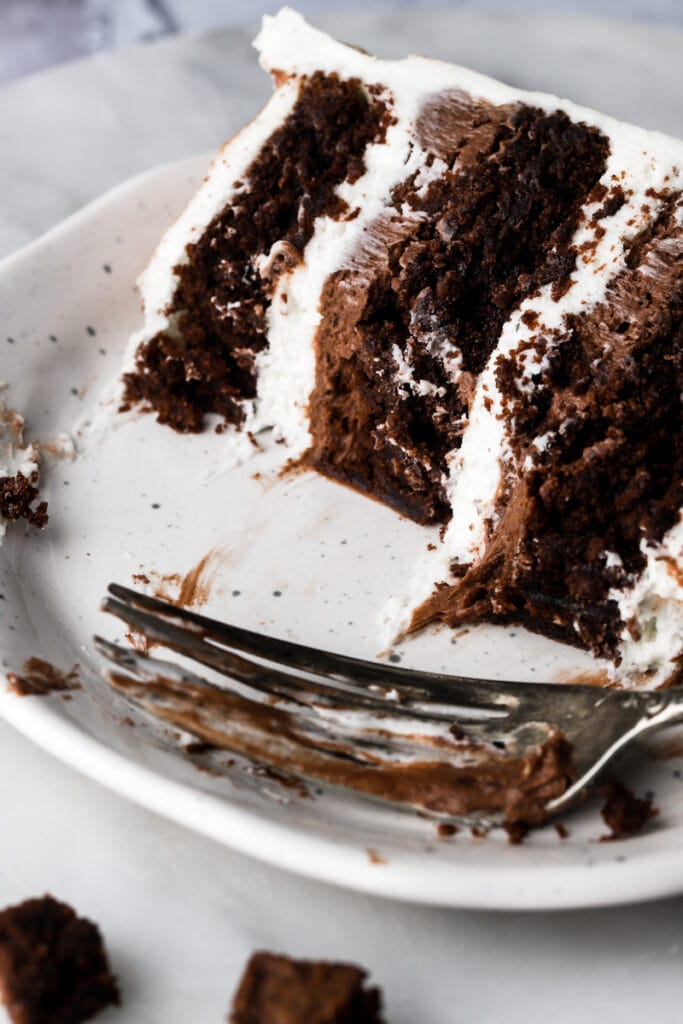
I don’t know about you but when I think of a brownie cake, I think of a gorgeous, show-stopping stack of brownies frosted with whipped fluffy frosting. The brownies are rich, chewy and moist and the frosting is whipped tangy and sweet.
I paired my brownies with a cream cheese frosting because brownies are generally more rich and sweet than traditional cake layers. I felt the cream cheese would kind of balance the sweetness a little with it’s tanginess.
Why you’ll love this brownie cake
- It’s unique and like none other.
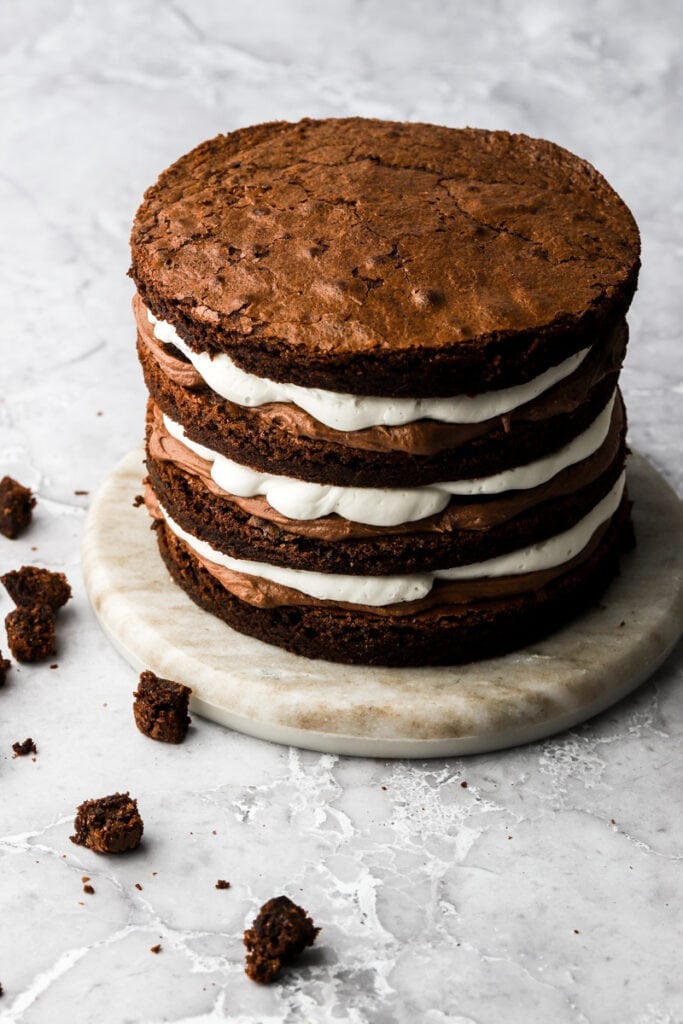
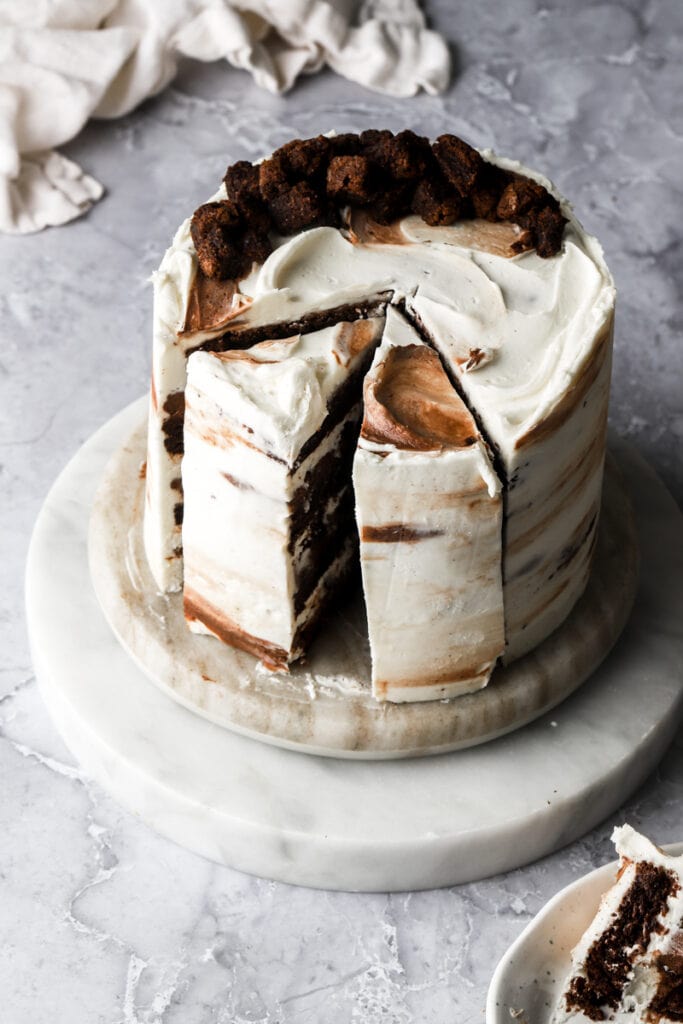
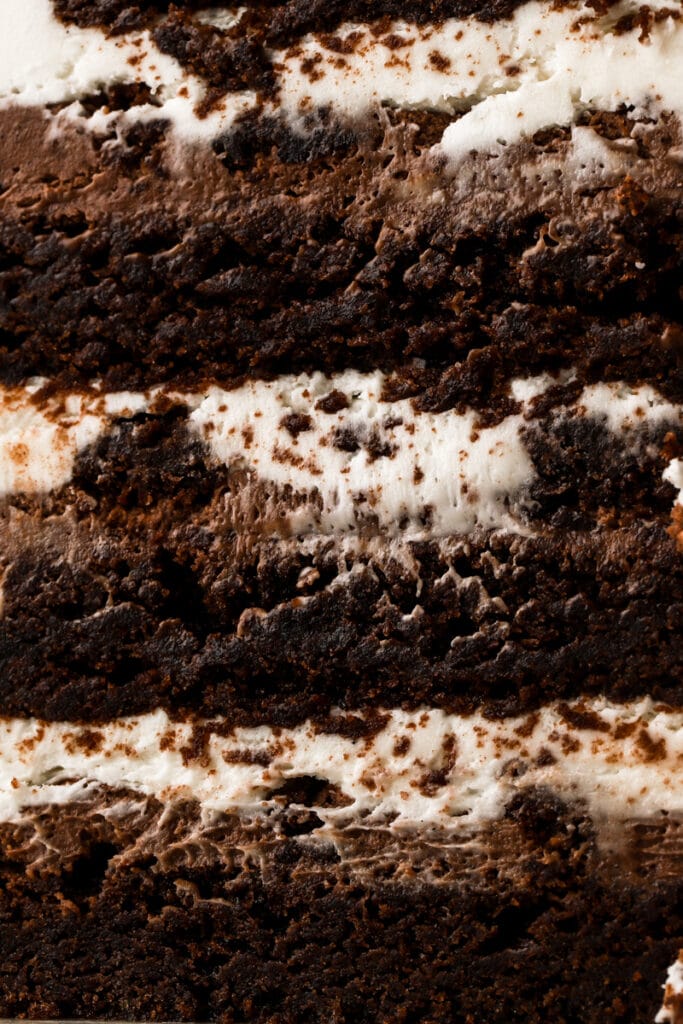
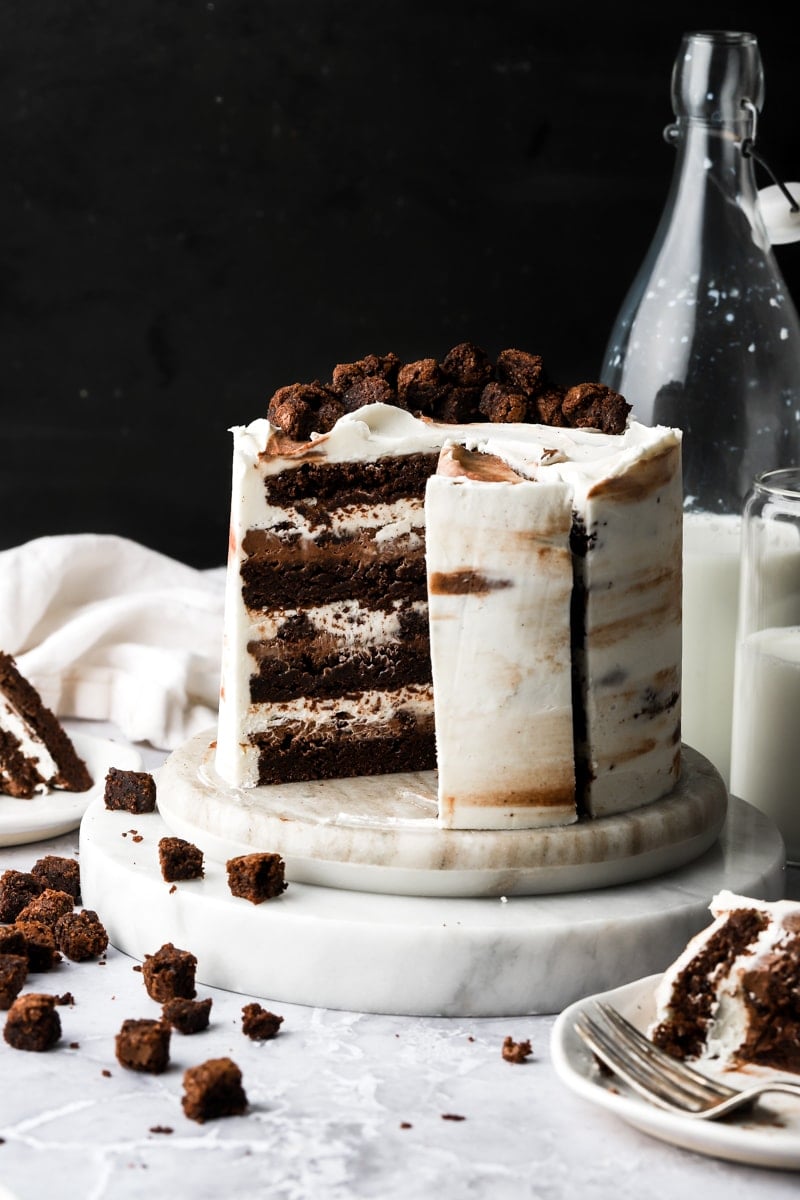
- Four layers of fudgy brownies that are made using one bowl and one pan.
- Couldn’t decide between chocolate or vanilla frosting so there’s both and they’re made from one batch!
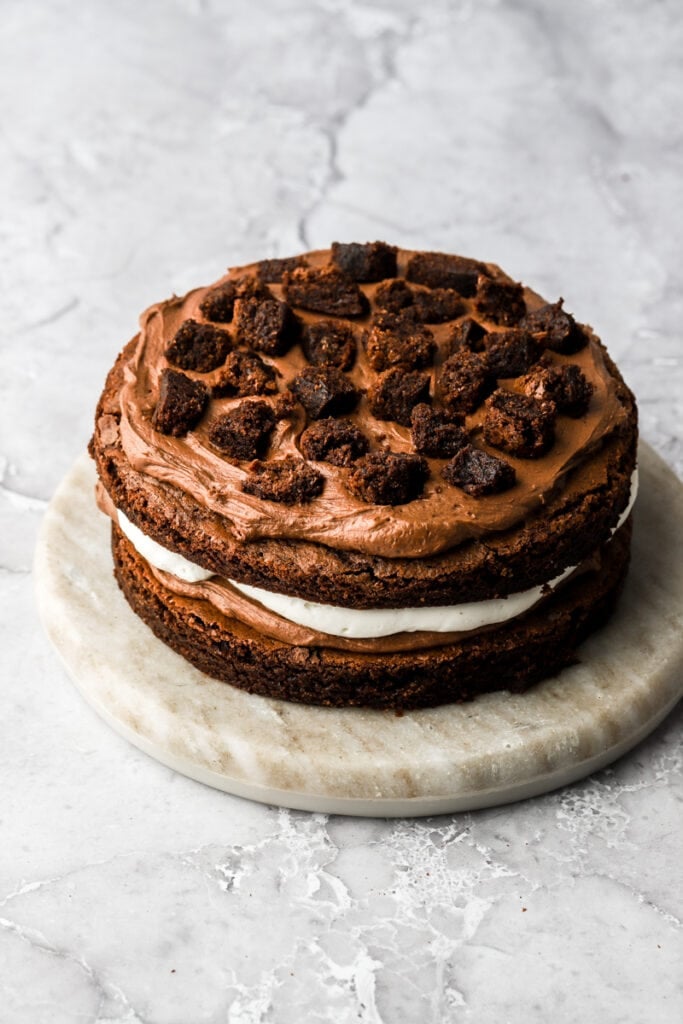
- More brownie chunks between the layers of frosting.
- The cake recipe is very forgiving and allows for many substitutions and dietary restrictions.
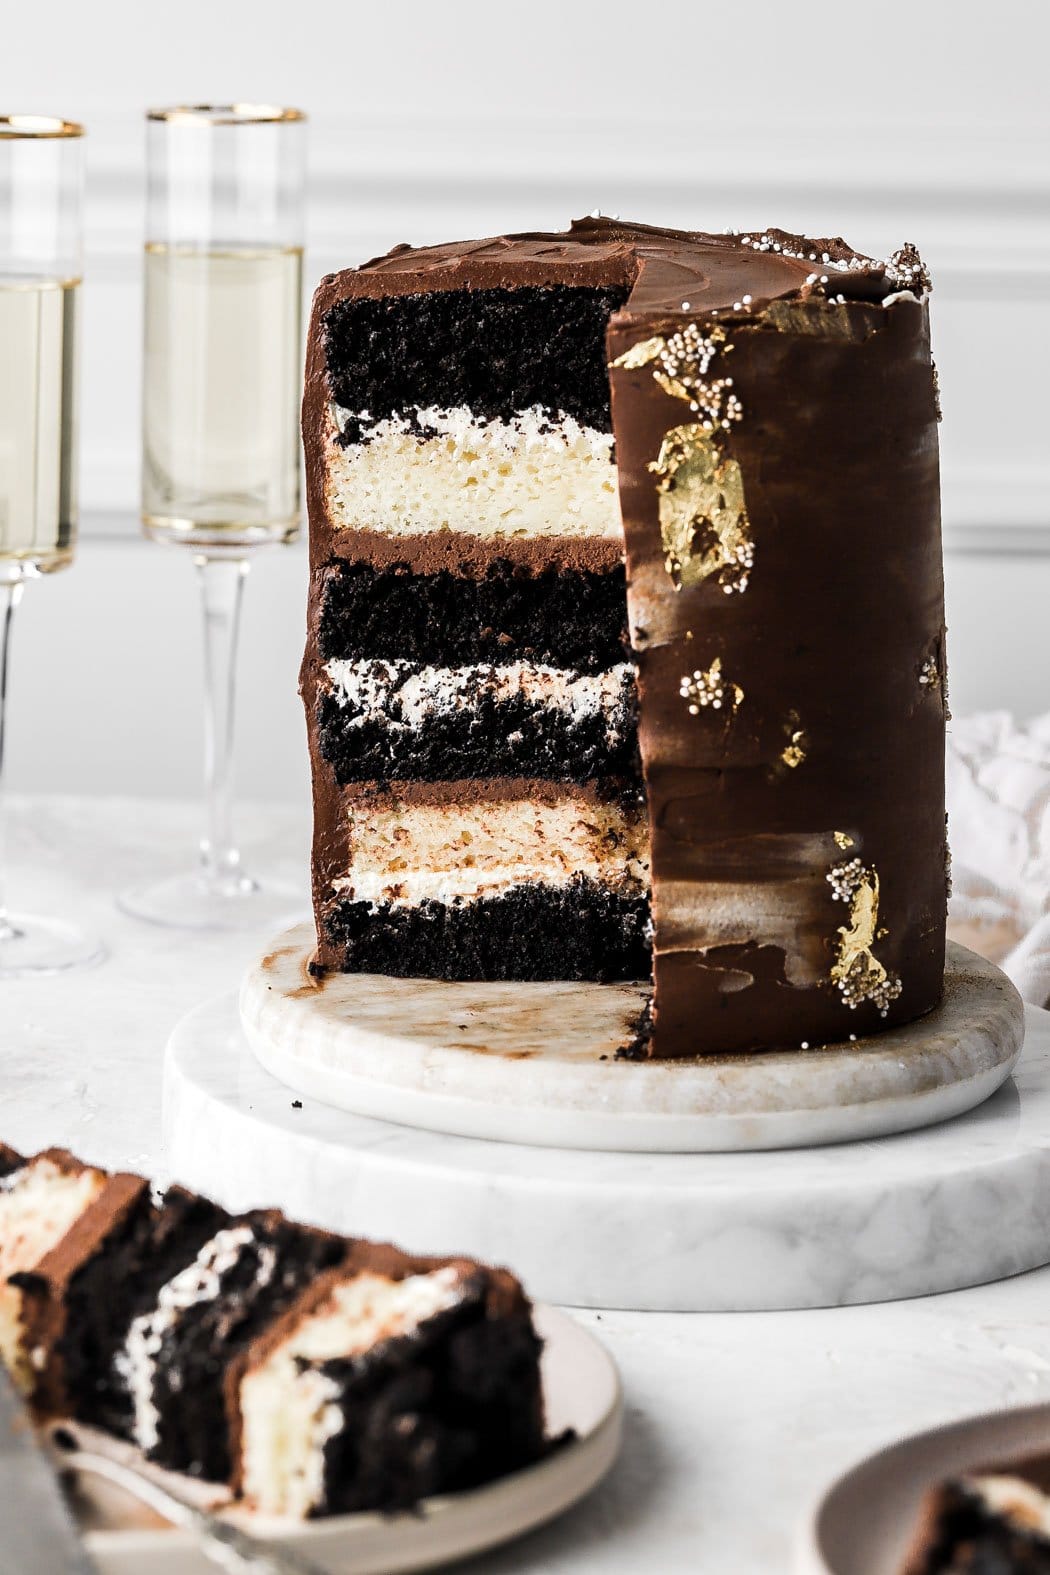
I also think you’ll love my chocolate ganache cake, marble cake with whipped buttercream and chocolate ganache, chocolate mousse cake and My PERFECT Brownies.
Ingredients & Substitutions
- Flour: I use all purpose flour in most of my recipes and I HIGHLY recommend using a digital scale, as flour (and cocoa) is so often over measured.
- Sugar: I used granulated sugar and brown sugar in the brownies and powdered sugar in the frostings.
- Cocoa Powder: I like to use dutch-processed cocoa powder but natural cocoa powder also works. Again, I recommend using a scale to measure this out.
- Make sure you’re not using any kind of sweetened cocoa powder.
- Butter: I used Danish Creamery’s European Style Unsalted Butter. I LOVE this butter because it’s 85% butterfat. The higher fat content makes the frosting extra creamy and the brownies extra fudgy.
- Salted butter also works in the brownies, just omit the extra salt.
- Eggs: make sure to use room temperature, large eggs, about 55-60g each.
- Pop them in hot water for a few minutes if they’re cold.
- Heavy whipping cream: I like to add heavy whipping cream to my frosting and whip it for a couple of minutes to really get it nice and fluffy.
- You can also use milk but it won’t give it the exact same fluffy texture. I would start with half the milk though and see how the texture of the frosting is before adding more.
- Vanilla: Any vanilla extract is fine to use in the brownies but I like to use vanilla bean paste for frostings.

Step-by-Step Instructions
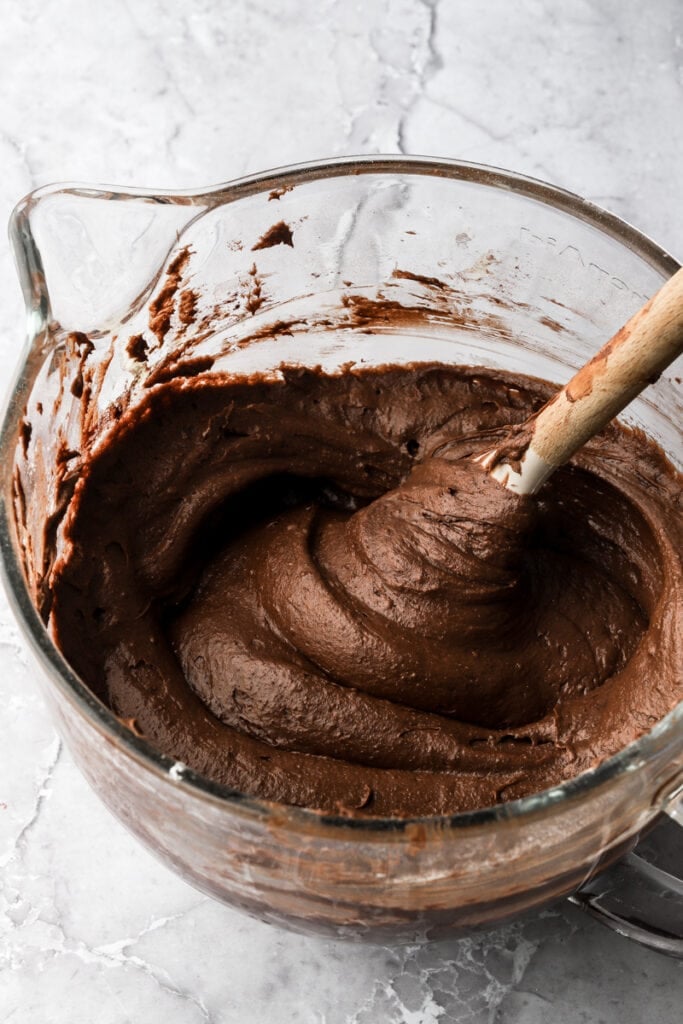
Step 1: Make the brownies by melting the Danish Creamery European Style Unsalted Butter. Whisk it aggressively with the sugars and the eggs, until it’s pale and ribbons off the whisk, this may take a few minutes.
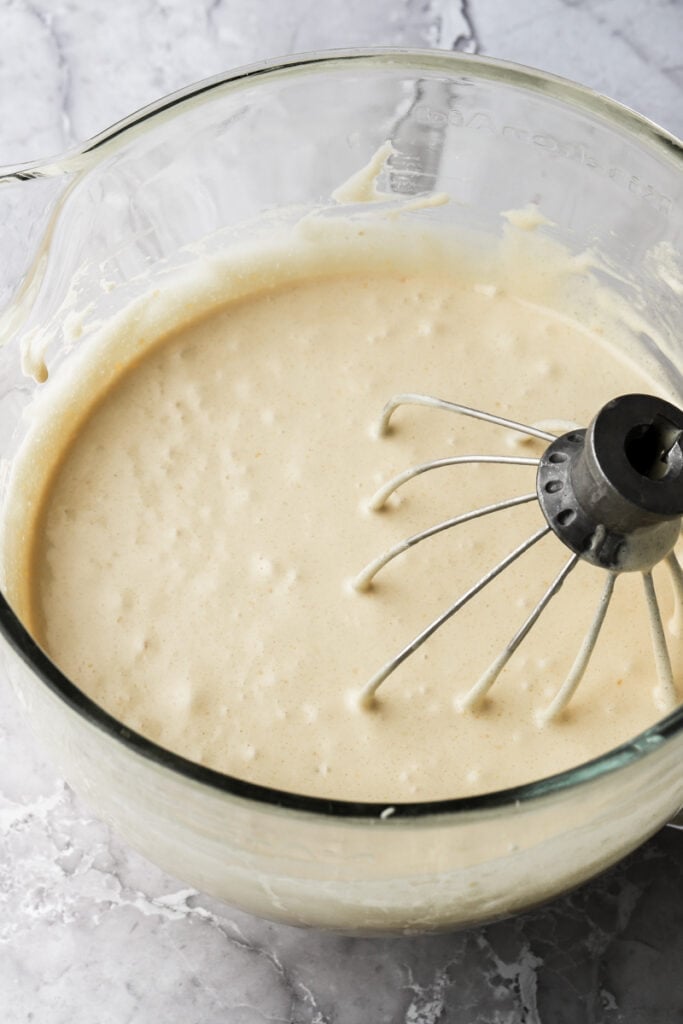
Step 2: Add the cocoa powder and the salt, and whisk aggressively again until it’s well combined.
Step 3: Add the flour and whisk just until the last streak of flour is combined.
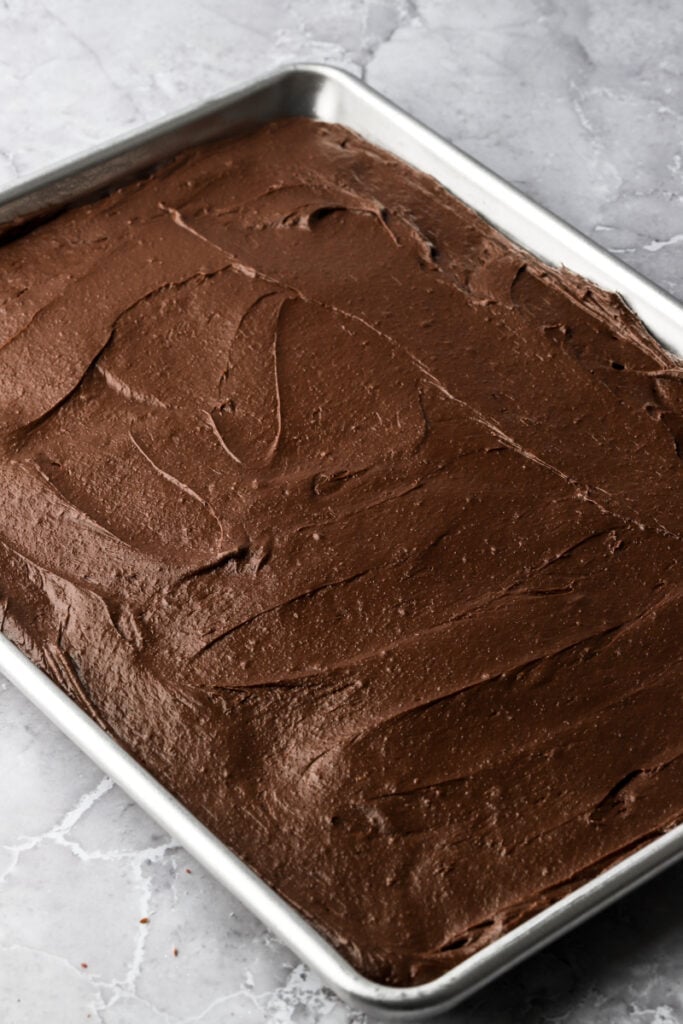
Step 4: Spread into the prepared pan and bake for 25 minutes. The edges will be fully set and the center should still be really soft but should no longer look wet on top and should not feel like liquid. When you touch the center, it should feel like it’s beginning to set underneath.
Step 5: Once the brownies have cooled use a 6 inch round cake cutter (or outline with a 6 inch cake pan and trim with a knife) to cut out the brownie layers.
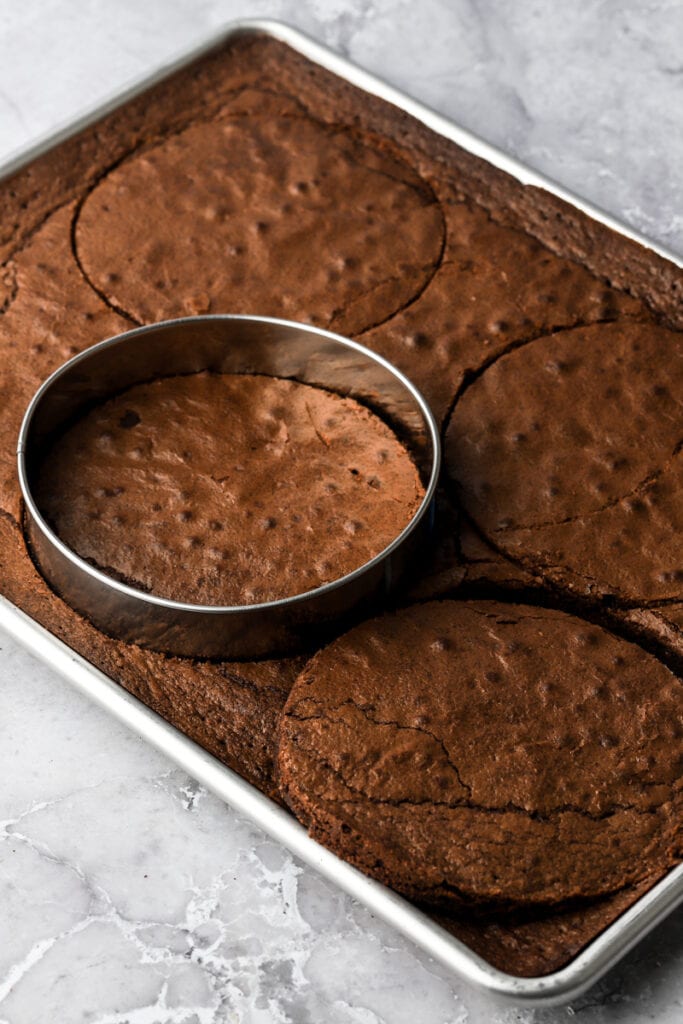
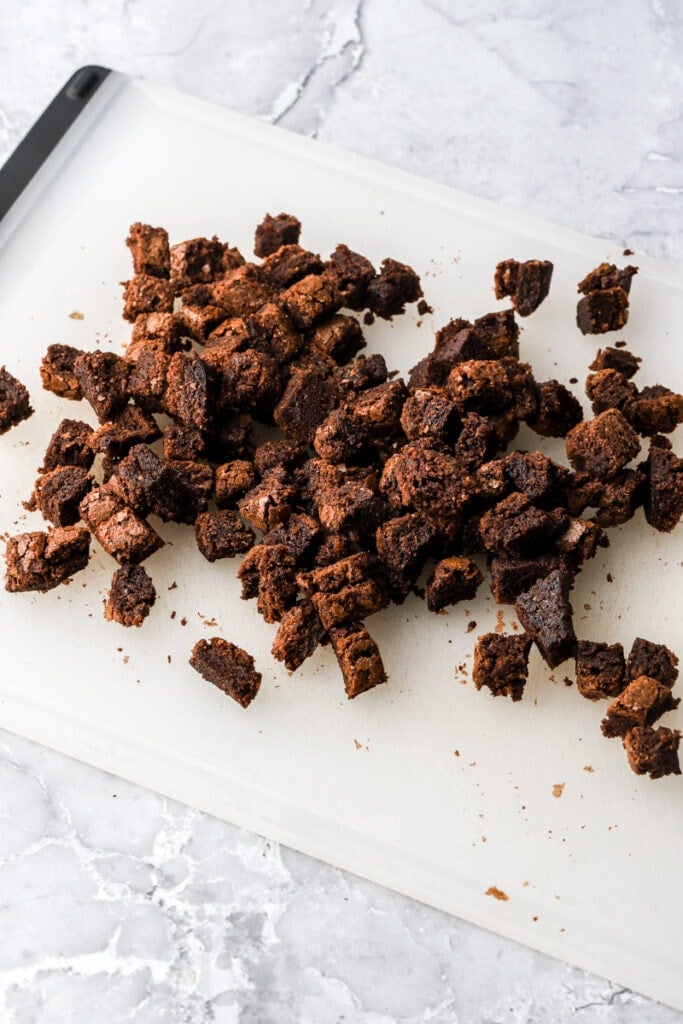
Step 6: Cut the scraps of the brownies into small little brownie chunks, about the size of an M&M.
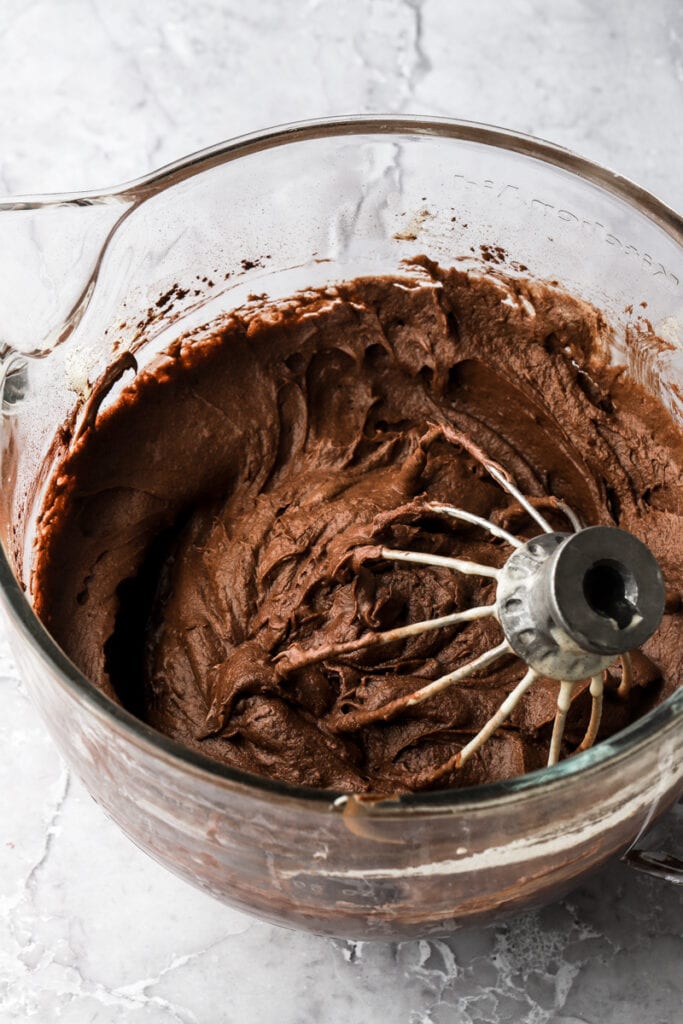
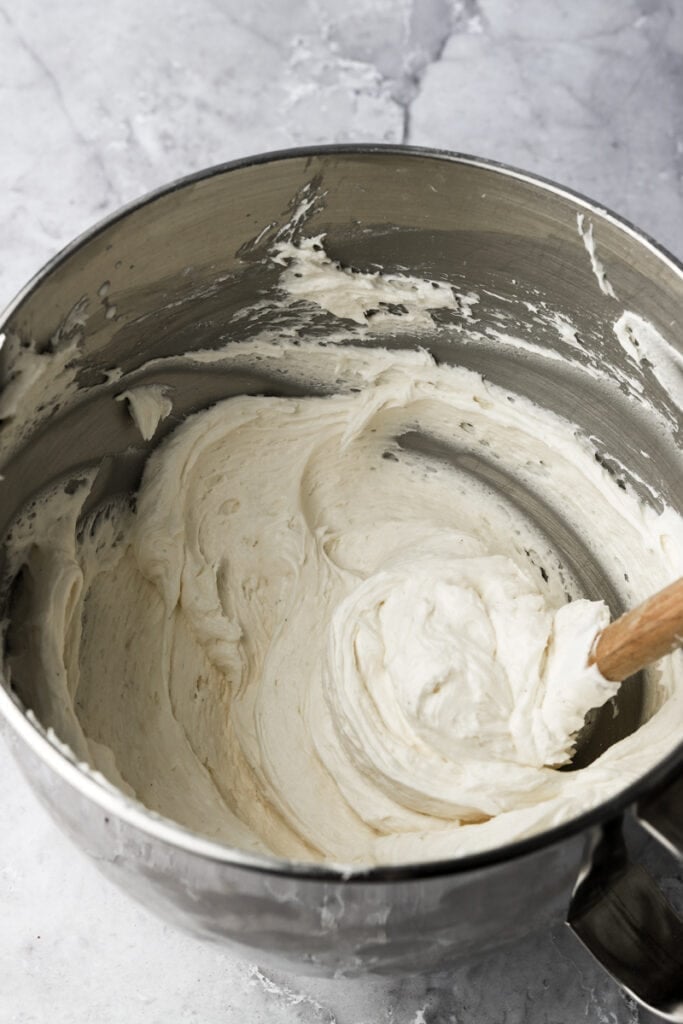
Step 7: To make the frosting, whip the Danish Creamery European Style Unsalted Butter at full speed, until it’s pale and fluffy. Add the cream cheese and beat until they’re combined. Then add the powdered sugar and mix on low speed just until it comes together. Increase the speed to high for a few minutes and then reduce the speed to medium-low and stream in the heavy cream and vanilla bean paste. Beat for 1-2 more minutes until it’s smooth, creamy and fluffy.
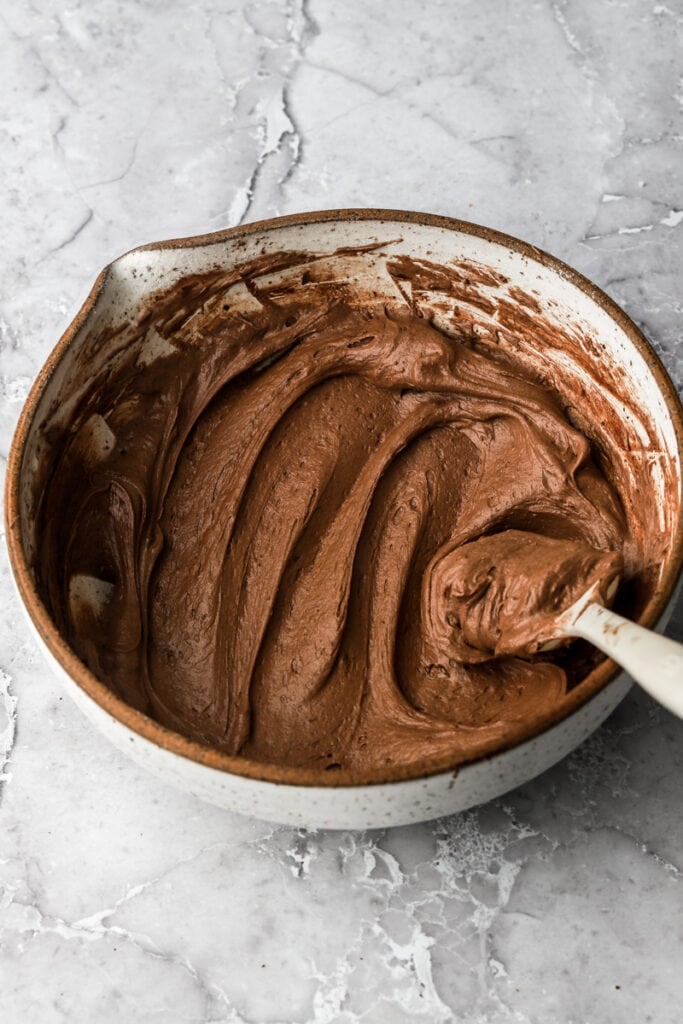
Step 8: Remove 1/3 of the frosting (about 10 ounces) and add the cocoa powder and the rest of the cream to it, mixing just until it’s smooth and creamy.
Step 9: Assemble the cake by placing the first layer of brownie on a flat surface. Frost with the chocolate frosting and then place some brownie chunks on top. Frost with the vanilla frosting and place another layer of brownie cake on top. Repeat until it’s done and refrigerate until it’s set.
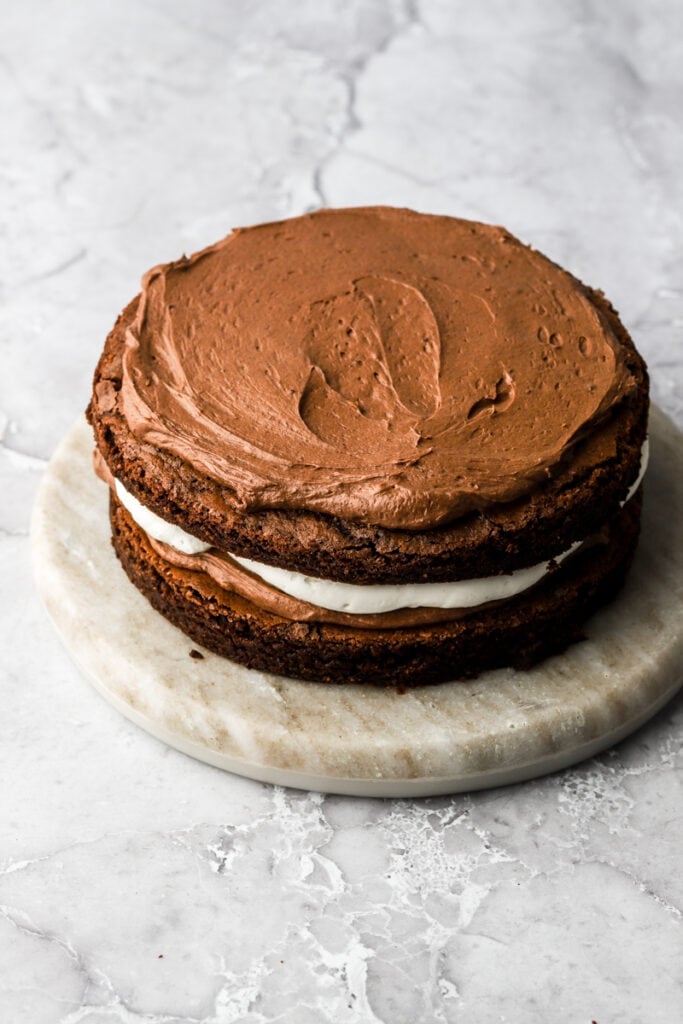

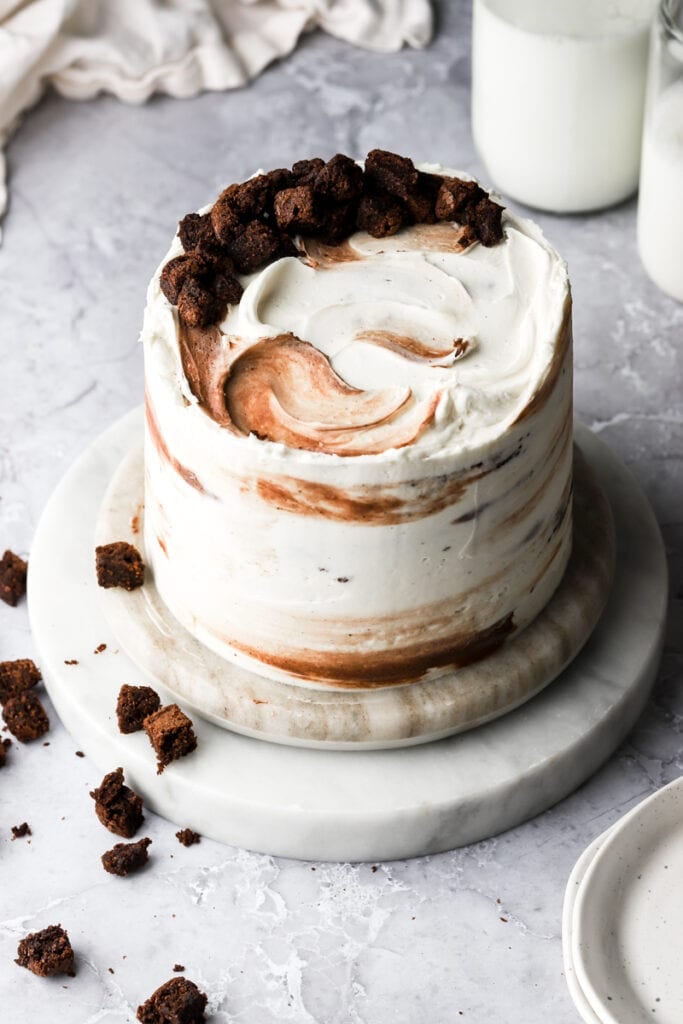
Step 10: Frost the outside of the cake with the vanilla frosting and add some dabs of chocolate to lightly marble it. Top with leftover brownie chunks.
How to know when brownies are done baking
When the top of the brownies are no longer wet and have formed a thin little crackle on top, gently press on it and it should still feel soft but you should be able to feel some resistance.
When you move the pan, if the batter jiggles, it’s definitely not done baking. You want to be able to touch the top of the brownies and feel some resistance. It should feel like a brownie that’s a little “too gooey but almost perfect”.
At this point, you’ll remove them from the oven and they will continue to bake as they’re cooling. If they’re fully set when you remove them from the oven, they won’t be very fudgy once they’re completely cooled so make sure they feel a little ‘under-baked’.
Frequently Asked Questions
Let’s be real, nothing compares to Danish Creamery European style butter but you can use dairy free butter, dairy free milk/buttermilk to make any of my cakes. You can also use a dairy free cream cheese, butter and heavy cream to make the frosting.
All my cake recipes work well with a 1:1 gluten-free flour. Make sure to use one that already has xanthan gum added.
You can make this cake in:
I used an 11×15 inch sheet pan and I had a little wiggle room, so something just slightly smaller (like 1 inch off) should still work. Just measure out to see if you can still cut out four cake rounds.
You can also bake this in five 6 inch pans (use the last one to make the chunks) but then your brownie cake layers will all have “edge pieces” which some may desire but I don’t lol. I’m 100% a “middle brownie” person.
You can also use 8 inch pans to make three 8 inch layers but you may not have enough for the chunks between.
I know many people are picky about their buttercreams, as am I, that’s why I wrote my cookbook, Frosted. If you’re not into the super sweet frosting, feel free to swap it with any frosting from my book or Swiss meringue buttercream or my French Buttercream.
You can also sub the cream cheese for an extra stick of butter (and a couple more tablespoons of heavy cream) for a traditional American buttercream.
How to make ahead
To make the brownies ahead of time: You can make the brownies layers even a month in advance. When you remove them from the oven, let them cool for about half an hour, cut the layers, and then wrap them individually in plastic wrap. Then place them in a freezer bag, squeezing out all the excess air.
Bring back to room temperature before frosting or frost them while they’re frozen, but work quickly or the frosting may set way too fast from the cold brownies and make it difficult to spread.
To make the frosting ahead of time: I don’t prefer to make frosting ahead of time as it can be temperature sensitive but it’s doable. You can cover it and store it in the refrigerator for a few days or freeze for a few weeks. Make sure to bring it back to room temperature before frosting the cake. You may have to re-whip it.
How to store finished cake
I usually just cover my cakes with a cake dome or place it in an airtight container and store it at room temperature for 1-2 days HOWEVER, cream cheese frosting as to be refrigerated so make sure to store it in the fridge overnight. Feel free to bring it back to room temperature before serving though.
It’ll stay well covered in the fridge for about a week but it dries out quicker than the freezer so I recommend freezing after a few days.
To freeze the whole cake, refrigerate it until it’s firm. Then wrap it in plastic wrap so it’s completely covered. Then wrap it in aluminum foil and freeze.
To freeze slices, place the slices in an airtight container and then place the container in a freezer bag, squeezing out all the excess air. You could also wrap each slice with plastic wrap and then place them all in the freezer bag.
Bring it back to room temperature by thawing at room temperature for a few hours before serving.
Thanks so much for reading today’s post, if you have any questions just comment down below. Make sure to leave it in the comment section because I can’t answer in the rating section.
If you make this crazy indulgent brownie cake, I’d love it if you left a star rating for me. If it’s less than five stars, please let me know why in the review! 🙂
As always, have a blessed day and happy baking!
Love, B


Made the brownie cake for my grandson’s 18th birthday. He’s chocolate brownie obsessed . It was a huge success with all 10 grandkids , so keep on baking up these fantastic recipes Baran Bakery ! Thanks for the culinary ingenuity
Bonjour,
Je vous suis depuis quelques années depuis la Belgique. J’ai déjà réalisé ce délicieux gâteau qui avait eu un réel succès. Cette année, pour les 4 ans de mon petit garçon, j.aimerai utiliser la recette en version Numbers cake. Pensez vous que la crème puisse tenir en étant pochée ? Peut être rajouter un peu de beurre? Merci pour votre retour. Et merci pour toutes vos recettes, c’est toujours un régal
I have been trying to find a brownie cake layers to make a birthday cake, I didn’t have much luck apart from this recipe. It’s perfect and the brownie layers get better each day. It has the right texture in the layers and right gooeyness.
The taste of the brownies and the meringue that I made was amazing. However I only got 2 layers from my pan, and barely got that, even with going all the way to the edges of the pan. I used and 11×15 and a 6in cutter so im not sure what happened. It didn’t matter anyway and I just ended up with a ton of brownies and a whole thing of meringue frosting because everything fell apart as soon as I tried to pick things up. I have no idea what went wrong. 😭
Hi Abigail, sorry for the delay, I’m just now seeing this. Idk what could’ve went wrong in the measurement, you can see my photo, I cut out four cake layers and I just remeasured that pan to double check the size is right.
As for it falling apart, meringue frosting is never going to set firm like other frostings and buttercreams so I don’t recommend using that for such a dense cake like this brownie cake. Even if you had stacked it well, when you go to slice it, it would’ve all squished out.
Making this tonight! I’m assuming you meant 325f for conventional oven and 300f for convection oven? At least, that’s the conversion I’ve always seen, but I wanted to make sure. Thanks!
325F should be fine for either, I’ll update that!
This recipe is the ultimate brownie cake recipe. Its perfect !!! I have made this 4 times now, as layered cakes and sheet cakes with the cream cheese frosting and buttercream frosting, although I used my own recipes for the frostings since I live in India, and frosting ingredients work a little differently here. Beautiful recipe….thank you so much.
Hi, thank you so much for the review! I’m so glad you like the cake <33
Great recipe! Brownie texture and flavor is spot on. Everyone loved this cake- next time I would reduce the sweetness in the frosting; otherwise perfect balance and easy to assemble. I made 1.5 times the recipe and used a 15×20 sheet pan and a 9” round pan to yield a 4 layer, 7.5” cake. Agree that trimming the edges is key.
I’m from Fresno County where Danish Creamery exists. It’s great butter!
So first off the taste is amazing. 5 stars! But I have no idea how you got 4 6 inch out of the 11×15 pan. Literally impossible for me. I’m currently making a second pan. I also wish I would have done an 8 inch circle since I have to bake a second anyway. The 6 inch cake is much smaller than I imagined. So most of my issue is probably a me thing. But the taste is simply amazing.
Hello, could you please tell me how many servings this cake makes? For how many people is it?
Hi, i need an advice, I’m just doing this cake for bf birthday and it’s been 45 min in the oven and it’s still not done…the center of brownie cake is still watery, shoud i leave it there? Thanks you.
Hi Barbora, I’m sorry I saw this too late. How did the cake turn out?
This brownie cake looks really good. I’m wondering though, if it could be made in layers in 6″ or 8″ round cake pans or would the outcome be different? I suppose that with 8″ pans, the layers would be thinner, maybe just three layers with no extra for the brownie pieces added on top.
Hi, I listed other cake pan options in the FAQs but yes I think if you did the 8 inch you wouldn’t have enough for the chunks between 🙂
This looks so good! Could I use a whipped cream frosting ? Would it hold up between the layers or is the cake too heavy? Thanks!
Hi Kathy, I think it may be a little heavy for a whipped cream frosting but if you’re careful when stacking it may work. I think it’s worth a try!
What butter should I use if icant get the danish creamery?
any butter will work fine, although I prefer European butters that have a higher butterfat content 🙂
Hi ! Could you please tell me what cocoa brand do you like more.
Thanks!
Hi, I like Ghirardelli Dutch process and Rochelle Dutch process 🙂