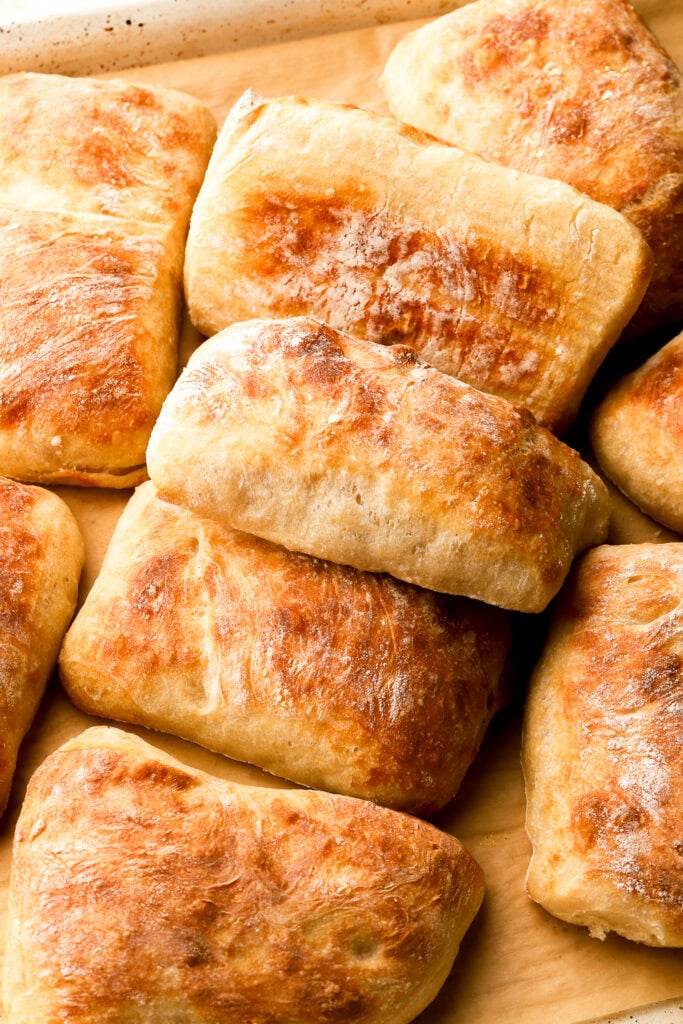
Quick & Easy Ciabatta Bread
If you’ve been here a while, you already know that I have one weakness, homemade bread.
I LOVE ciabatta bread for sandwiches and I didn’t have any at home so I thought, why not make some!
It turns out my favorite bread recipe is an 80% hydration dough and that’s exactly what ciabatta needs so I just tweaked that recipe to make it quicker.
Spoiler alert, it turned out PHENOMENAL.
This recipe uses only four simple ingredients, minimal hands on time and makes 10 perfect little ciabattas.
What is Ciabatta?
There are so many types of bread and so many different recipes for each type of bread.
But at the same time, you can take one dough and do so many different things with it. So there’s a ton of rules but really, there could be no rules and bread would still be bread.
Artisan bread is traditionally lean, meaning it’s just made of just flour, salt, yeast and water. There’s different levels of hydration which is just calculated by dividing the weight of the water by the weight of the flour. I believe Ciabatta is traditionally around 80% so if you take my recipe, it’s 480g water divided by 600g flour which is .8 or 80%.
This bread is the same recipe as my Italian bread (because ciabatta is technically Italian; like the Italian version of the French baguette) but I upped the yeast and shaped them differently.
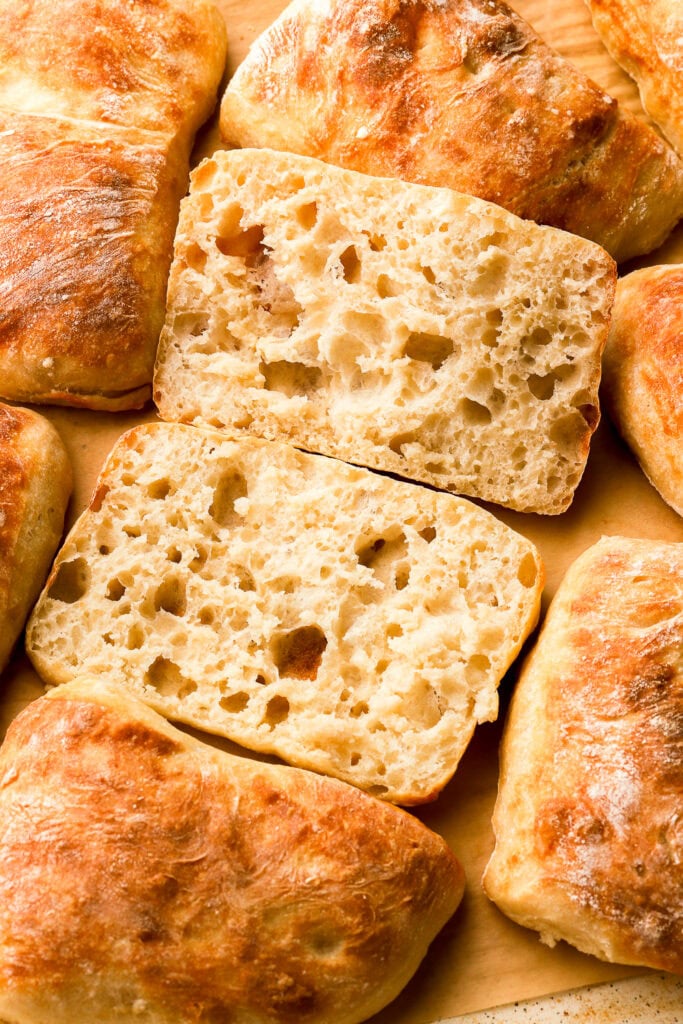
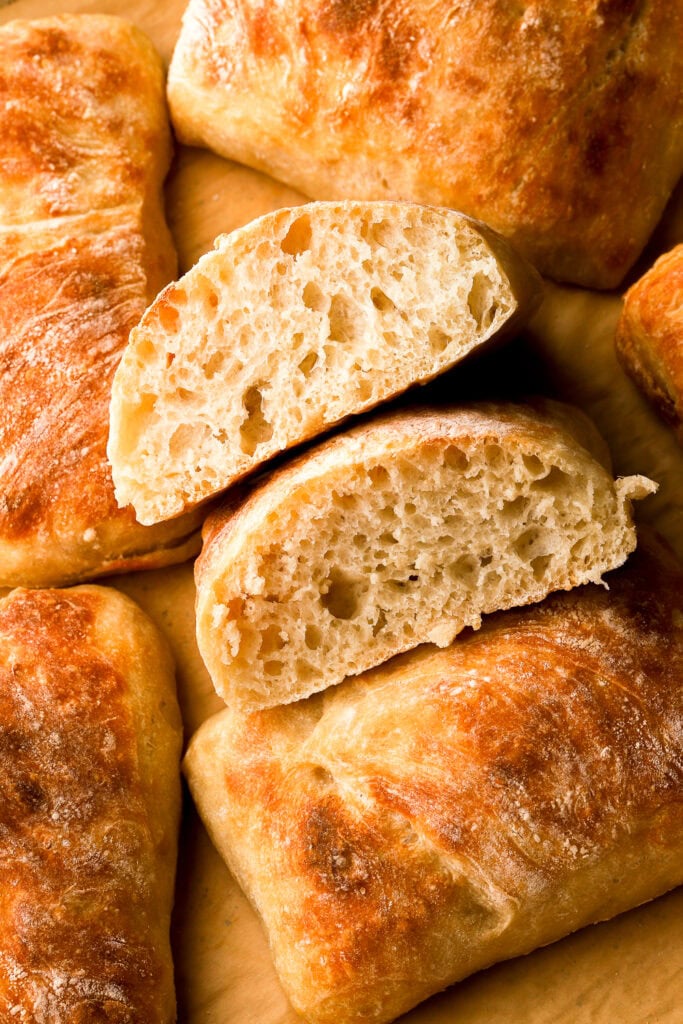
The crust is crispy and chewy but the crumb is so tender and fluffy.
It’s a no-knead bread and it still holds a great shape thanks to the stretch and fold method.
TIP: if you want to prepare this overnight, like my Italian bread, then stick to the lower yeast amount in that recipe. I made these to be a quick recipe.
Side note – a lot of recipes use a biga for ciabatta bread and I believe that is more traditional however, these turned out soooo good that I will probably never go out of my way or plan ahead to prepare a biga the day before lol.
Ingredients & Substitutions
This section is just a few notes on the ingredients – the full recipe with measurements is in the recipe card below.
Making bread sounds more intimidating than it is. It’s a very simple process, it’s just more of a timely matter.
- Flour – I use bread flour for this recipe. All-purpose flour should work fine but you may have slightly less structure here, especially because it’s not an overnight recipe.
- I like King Arthur’s Organic Bread Flour best because the higher gluten content gives it a better structure and chew.
- Water – I use warm water but it really doesn’t matter here. I don’t activate my yeast so as long as the water isn’t very hot, the temperature doesn’t really matter.
- Yeast – this recipe works with both active dry yeast and instant yeast. I follow the same process for both, I don’t even activate my active dry yeast, I just add it in with all of the ingredients and let it rest.
- Salt – I like using sea salt but any salt works fine. I would lower the amount to 10g if you’re not using sea salt though.
TIP: I HIGHLY recommend using a digital scale, as dry ingredients are almost always over measured.
How To Make Ciabatta Bread
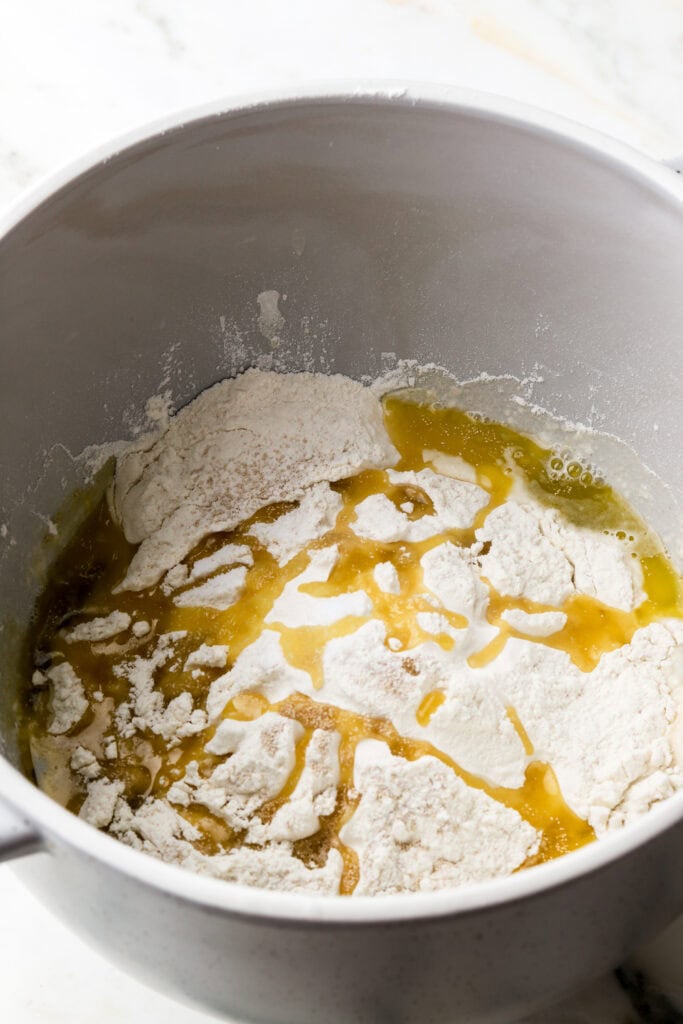
- Start by adding all the ingredients to a large bowl. I use the bowl of my stand mixer.
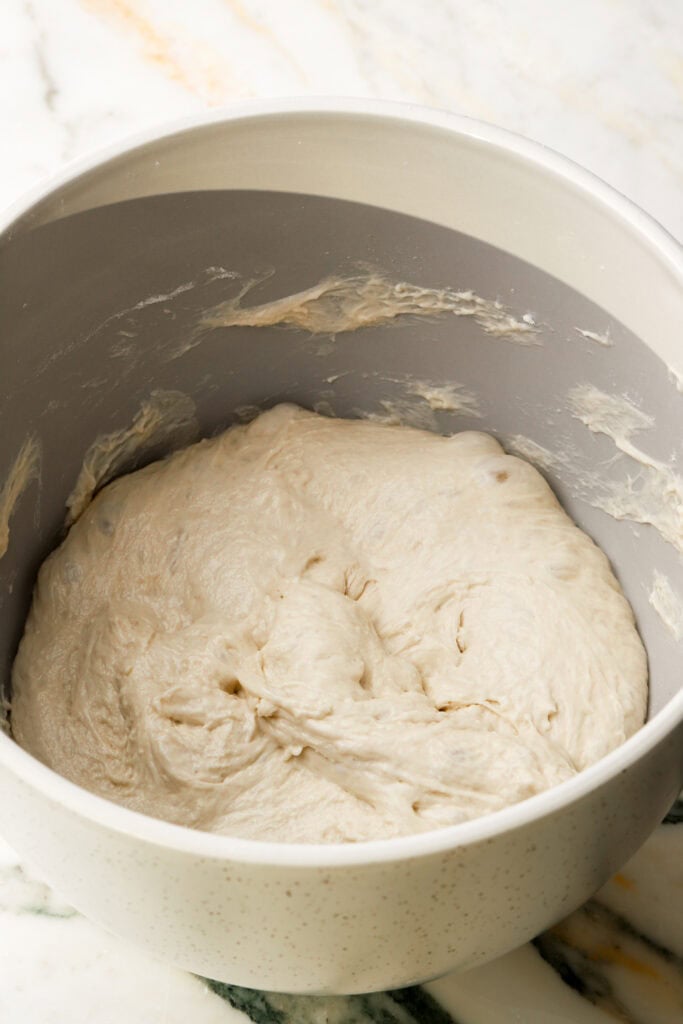
- Use the hook attachment or just a wooden spoon to mix the dough until the flour is hydrated. The dough will be very shaggy.
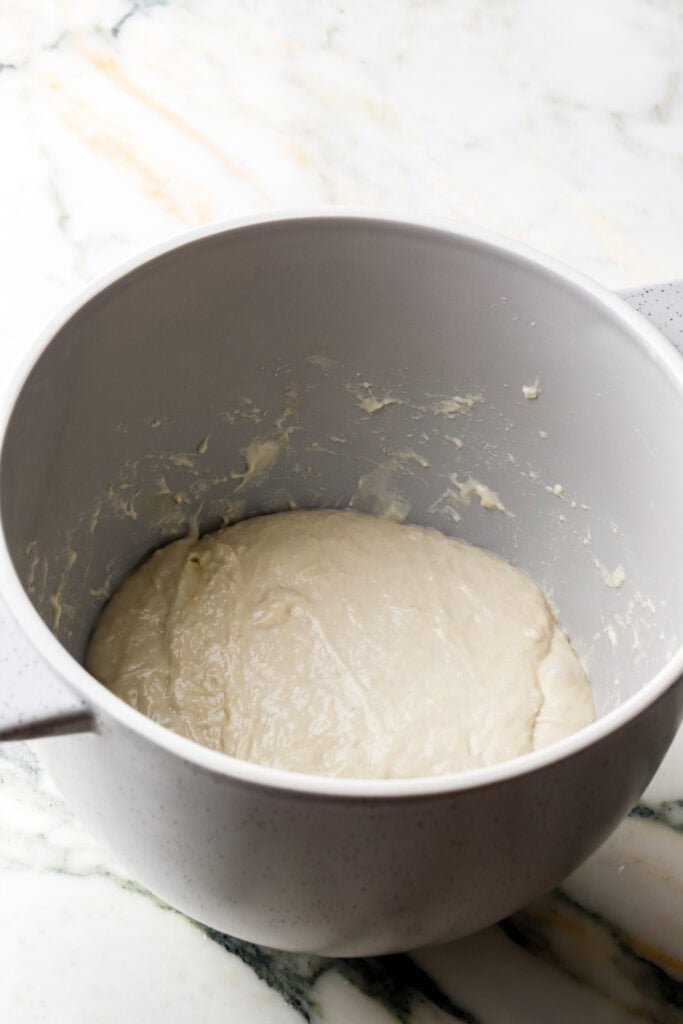
- Cover and let it rest for about 30 minutes.
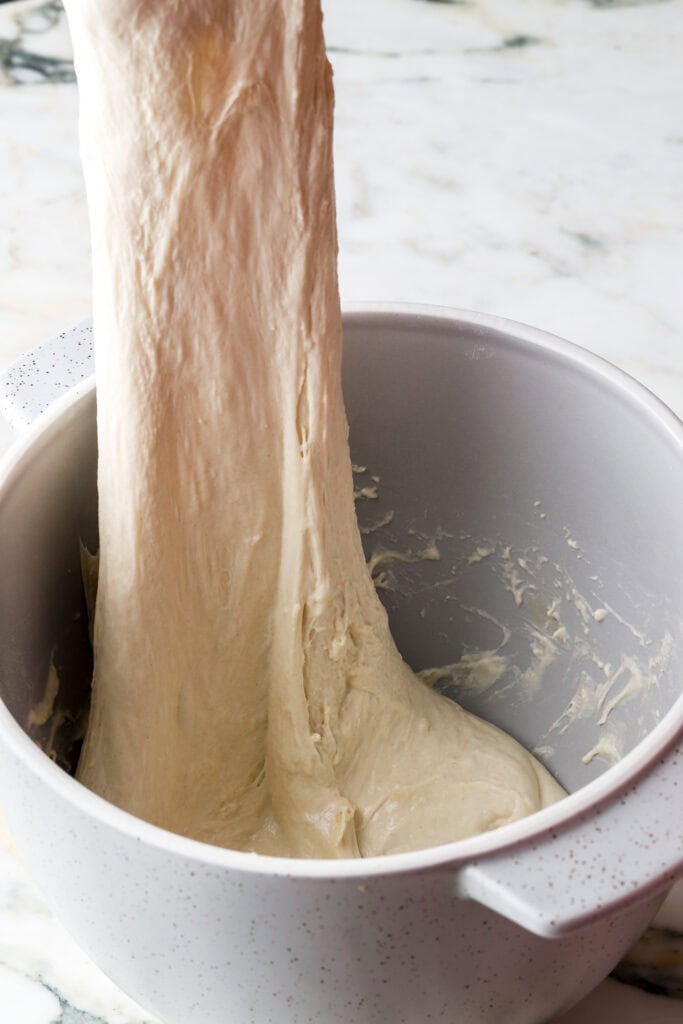
- To do the stretching and folding, I wet my hand with cold water and then stretch the dough out as far as you can without it tearing, and fold it over itself. Turn the bowl 90 degrees and repeat for four folds (like around the clock). Allow the dough to rest for another 30ish minutes and repeat with another set of folds.
- Drizzle a tiny bit of oil around the edge of the dough to coat the outside of the dough and the bowl so it doesn’t stick too much.
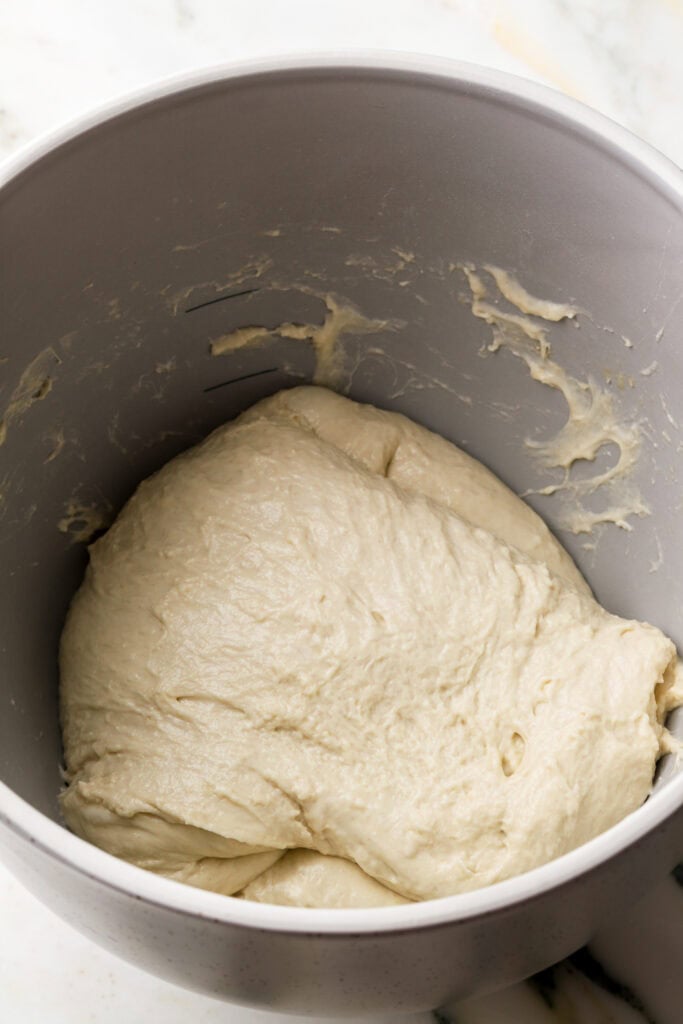
- Cover the bowl and allow it to rest for about 1-2 hours, until it’s about doubled in size and a bit jiggly.
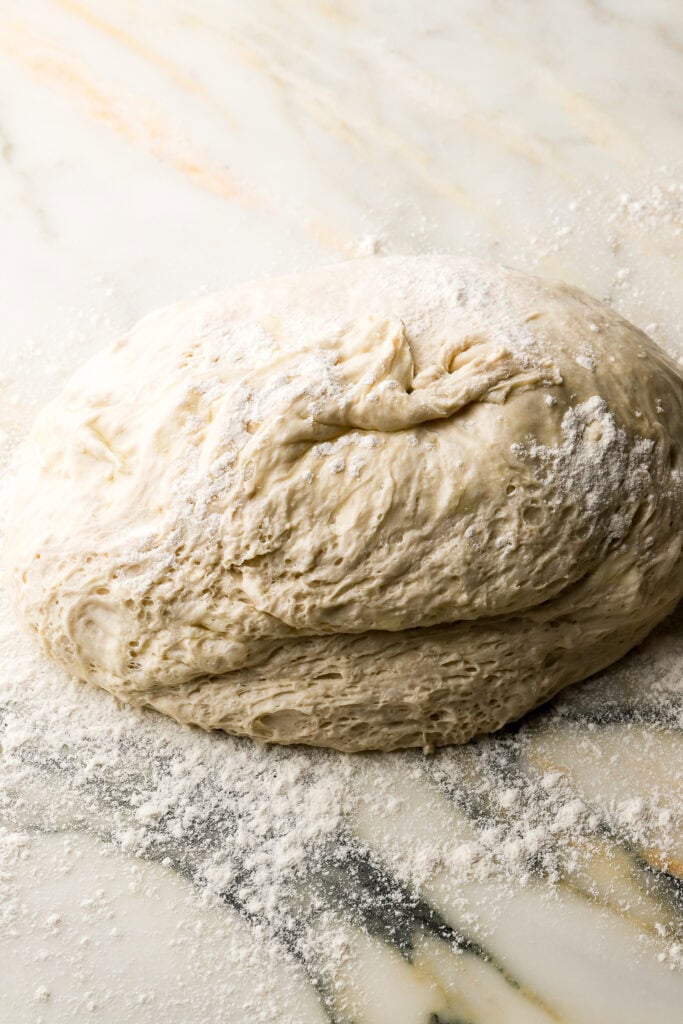
- Gently dump the dough out onto a lightly floured surface, try not to deflate it.
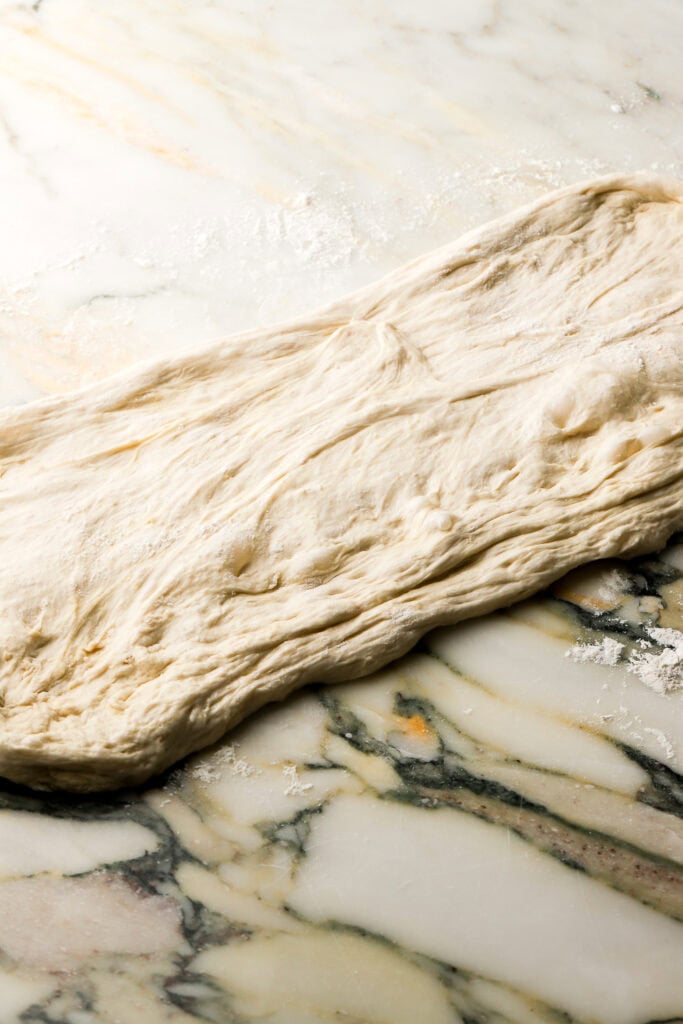
- Shape it into a rectangle GENTLY by stretching it out slowly with your hands. I do a long thin rectangle.
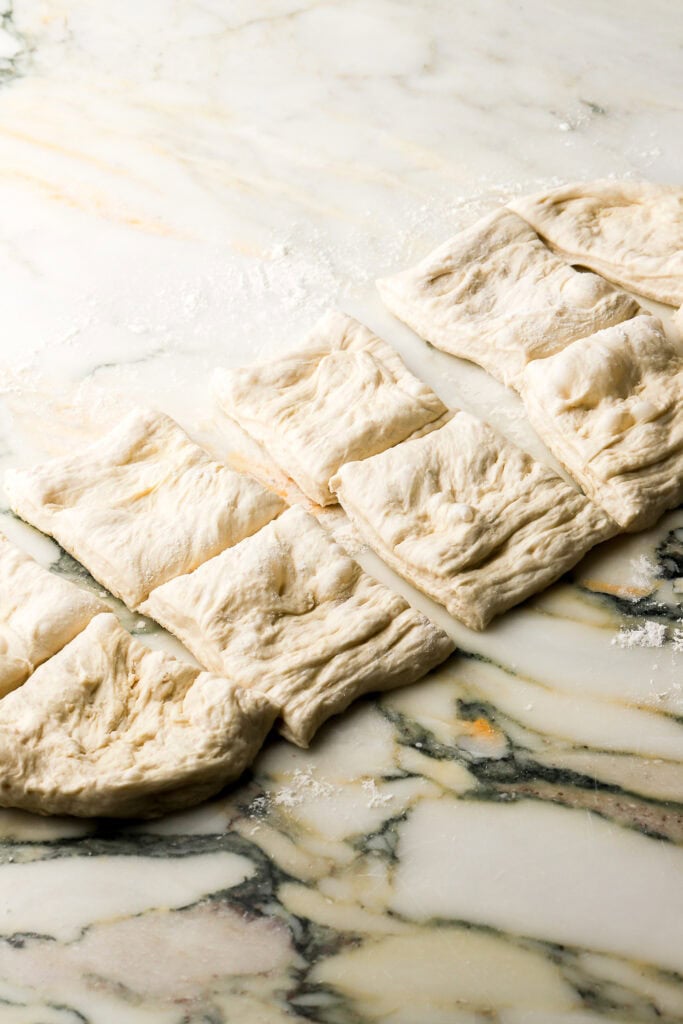
- Slice the dough in half, long way (like a hot dog). I use a bench scraper to cut them or a pizza cutter.
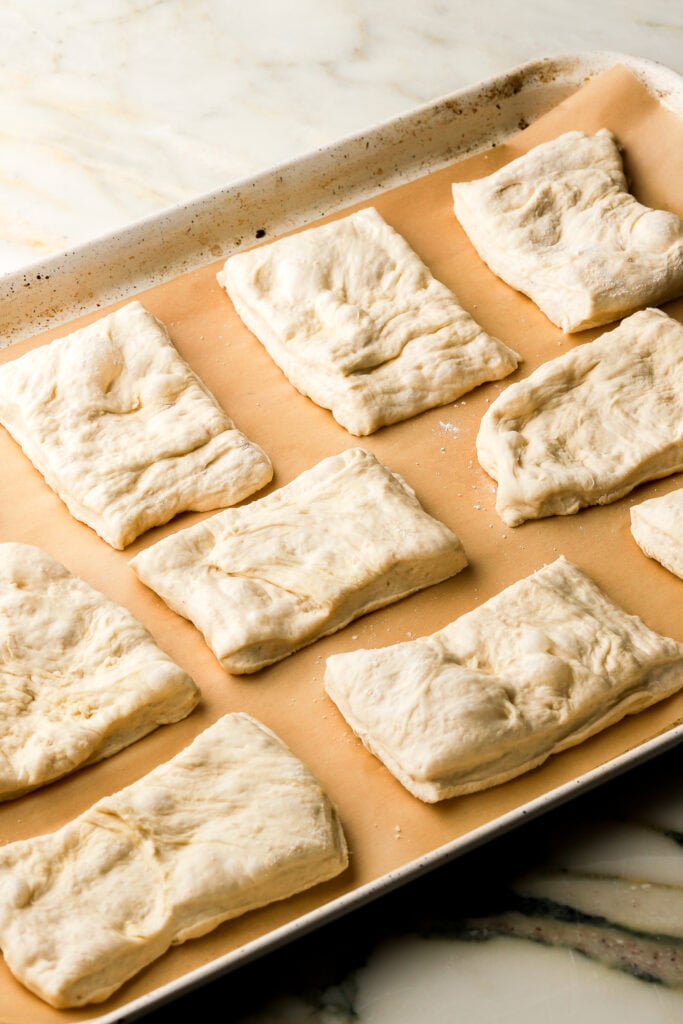
- Then slice each half into 5 squares. They don’t have to be perfectly square but try to get them about the same size so they bake evenly.
- Use the bench scraper to carefully pick up each square and place it on a cookie sheet. I have a large one so I bake all 10 together but you may need two pans for this.
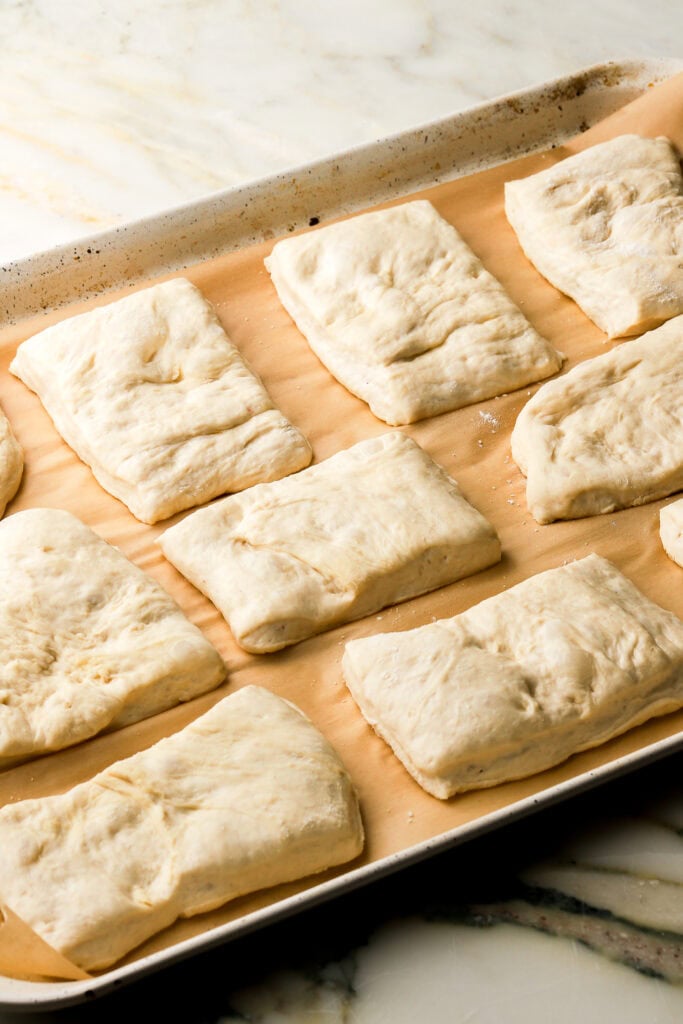
- Cover the pan with a tea towel or plastic wrap and allow the bread to rest again while you preheat the oven to 425F (218C). The dough doesn’t rise too much here, just a smidge more but if you did deflate it by accident, then give it more time to rise. Look at my photos to see how it looks before going into the oven.
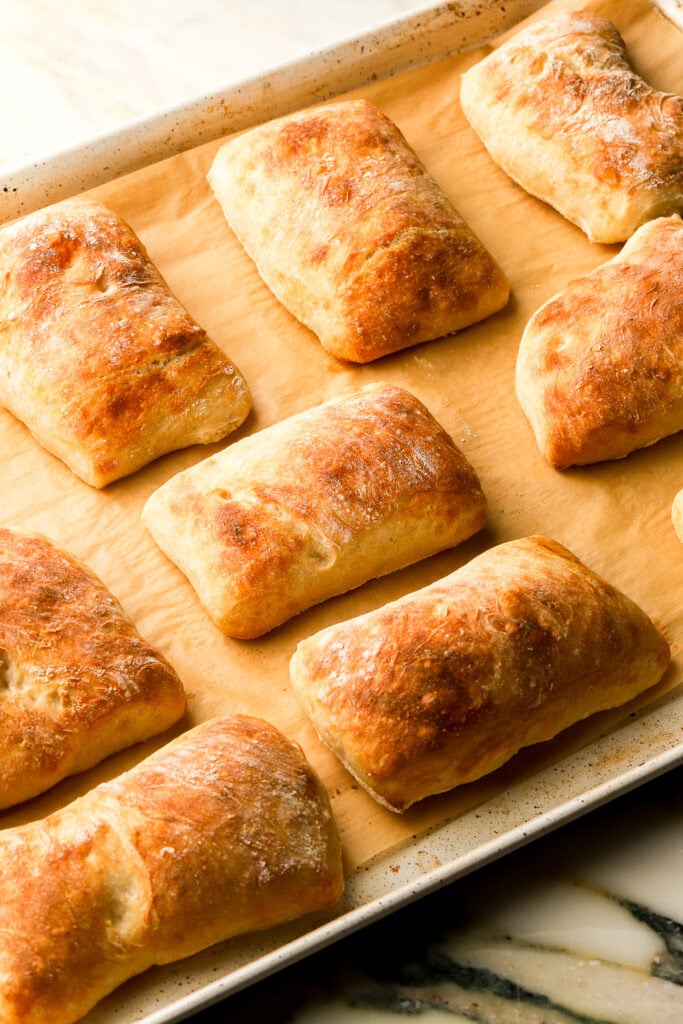
- Bake for about 15 minutes (I do the second half of the baking time on convection to get the tops more toasty). Remove from the oven and let them cool completely before slicing.


What Kind of Yeast To Use
The recipe is written using instant yeast because that’s what I had on hand but if you want to substitute it for active dry yeast, that works too.
Unlike instant yeast, active dry yeast usually needs to be activated by combining the warm water with the yeast in a large cup, mixing it and letting it rest for 10 minutes. The water should develop a thick layer of foam on top once the yeast is active.
I did skip the activating it in my Italian bread recipe and it still worked fine so honestly, it should work either way if your yeast is fresh.
Kneading The Dough
I don’t knead this dough. I mix it just until it’s all combined. The dough gets really sticky so let it rest for a little.
Then you’ll perform two series of stretches and folds to strengthen the gluten and then just let it rest.
Stretch and Folds
If you’re at all familiar with sourdough, you’ll likely know what this is.
Basically instead of kneading, we will stretch the dough out and fold it over itself to develop the gluten.
The stretching will help the gluten build strength to give it structure so you get a nice big oven spring.
You’ll start by just grabbing one side of the dough, stretch it out as far as it goes without tearing and then fold it over top of the rest of the dough. Do that four times, turning the dough 90 degrees each time so every side of the dough is stretched.
See the video below for a better reference.
Let it rest for 30-60 minutes and then repeat this again.
Since the dough is quite sticky at this point, run your hands under cold water between every stretch. This will prevent the dough from sticking to your hand as much.
What Temperature To Proof Dough At?
You want to make sure your dough is proofing at a comfortable temperature. I prefer slightly warmer than room temperature to get it to rise quicker so anywhere from 80F (27C) to 90F (32C).
The dough can also be proofed in the refrigerator. This is called a retarding proof because it really slows down the process.
The benefit of this is that you can just pop the dough in the fridge for a longer period of time and the dough will develop a stronger flavor if it rises for longer.
I would just do it overnight so about 8 hours, and up to 12 hours, if you’re going to refrigerate it though.
Rising and Proofing The Dough
Rising and proofing are typically used interchangeably but the initial ‘resting time’ is actually the ‘rising’ and the second ‘resting time’ is the ‘proofing’. The time needed for rising/proofing is dependent on the recipe and the environment.
Typically with instant yeast, a lot of recipes allow you to skip the first rise and just let the dough relax for just 10-30 minutes instead, before shaping the dough. For this bread, you will need to let it rise and proof.
A general guideline for proofing and rising is that the dough should double in size each time. It should also slowly spring back when you press on it, but also leave a small indent. This is not the case here.
This dough is pretty loose and doesn’t really spring back so you’re really just looking for a big of wobbly jiggle from the first proof.
For the second proof, it’s barely going to rise anymore here. It’ll puff up more a little but definitely not double.
Before going into the oven, the dough will be pretty soft and delicate.
How To Shape Ciabatta
Again, she’s a sticky dough so when handling, you’ll want to use a generous amount of flour on the work surface.
After the first rise, the dough will still be loose, however the gluten will have developed enough to hold itself together. You may get a little sticking to your fingers so flour your hands as well but overall, it should be able to be handled if you work quickly.
Dumb the flour onto a flour surface. Flour your hands and dust some more flour onto the dough. Gently stretch it out into a rectangle. Do not roll it out thin or stretch it far, just try to get a rectangle going like in the photos.
Then slice it in half like a hot dog & then slice each half into 5 so you have 10 (rough) squares.
How To Bake Ciabatta
My oven runs super hot on the bottom so besides pie, I pretty much bake everything on convection (which means the fan is circulating the heat around) for at least half the time.
I bake this bread at 425F (218C) in a large cookie sheet for about 15 minutes – half the time on convection to get some browning on top as well.
The internal temp of bread should be at least 195F (90C) but mine is usually around 200F (93C).
Don’t go based on the color on the top and don’t bother sticking a knife in there cuz that won’t do anything with dough.
If it’s fully baked, the bread should feel light when you pick it up.
TIP: I always recommend an oven thermometer just because oven’s can vary.
How To Serve Ciabatta
My personal favorite way to eat any bread is warm with European butter and flakey sea salt. I could literally live off that alone.
HOWEVER, I made this bread specifically for sandwiches!! It is the PERFECT bread for sandwiches because the whole outside is a crust so nothing is leaving through or getting soggy. It’s like if a bagel and bread had a baby.
Some sandwiches I’ve had on repeat lately:
- Shredded beef from a pot roast topped with bbq, swiss and pickled jalapenos (can also replace the beef with a bbq chicken)
- Turkey, mozzarella, tomatoes and pesto
- Ham, salami, turkey, garlic butter and avocados
TIP: to be the ultimate sandwich queen (or king), lightly toast bread with the meat and cheese on it in an air fryer or in the oven before adding on the cold toppings.
How To Store Bread
Obviously bread is always best fresh cuz there’s nothing like a warm slice of bread. However, this bread does keep really well!
I leave it on the counter in a ziplock bag for 4-5 days and if it hasn’t gotten eaten by then, I refrigerate it for up to a week or freeze it for longer.
My apologies for the length but I hope this post is helpful if you’re trying to make homemade ciabatta bread
If you make it, I’d love it if you left me a review or a 5-star rating and as always, have a blessed day and happy baking!
Love, B